
In this post we’ll learn how to add your custom HTML and settings to any of WordPress’ standard widgets or others. Using those settings we’ll learn different tricks in how to manipulate the widgets behaviour accordingly.
The first part; adding and saving your custom settings, is fairly easy. The second part depends on what specifically you want to do, and it depends on which widget you are manipulating. In this post I’ve included two examples; skipping a widget depending on a setting (for adding settings to control the widget’s visibility in certain cases), and manipulating the WordPress Navigation widget’s menu arguments. The example given for the second part should give you a good clue in how you can handle what you want to do.
Adding custom settings to any widget
For adding custom settings to existing widgets we use an action called in_widget_form. This action is applied to all widgets’ form() function, which is the function responsible for rendering the admin part of the widget.
With that filter we get three parameters but we’re really only interested in the first and the third. The first is the widget instance which we will use to fetch proper field names and IDs and (optionally) check what kind of widget we are hooked onto. The third parameter is an array of the widget’s saved settings, which we need to use to check the previous saved state of our settings.
The code below will add a checkbox with the setting name ‘awp-custom-setting‘. Adjust the name and HTML to what input you need. What’s important is to use $widget->get_field_name() to add proper IDs and name attributes to all your inputs. The value of your inputs should be populated with what has been saved earlier, and that’s something you’ll find in the parameter $instance. For checkboxes you can use WordPress’ function checked() to output the checked attribute.
add_action('in_widget_form', function($widget, $return, $instance) {
	?>
	<p>
		<input type="checkbox" class="checkbox" name="<?php echo $widget->get_field_name('awp-custom-setting'); ?>" id="<?php echo $widget->get_field_name('awp-custom-setting'); ?>" <?php checked(isset($instance['awp-custom-setting']) ? $instance['awp-custom-setting'] : 0); ?> />
		<label for="<?php echo $widget->get_field_name('awp-custom-setting'); ?>"><?php __('Activate something', 'txtdomain'); ?></label>
	</p>
	<?php
}, 10, 3);
After adding this to your theme’s functions.php or plugin code, all widgets should now get a checkbox at the end of their form in admin.
Target specific widgets
If you want to apply your settings only to one or some specific widgets you can compare the property id_base in the $widget object. You’ll need to know the base ID is – if you are unsure, simply do a var_dump($widget->id_base) inside the hook, save, and check the output for each widget in admin. For instance Navigation widget has the ID base nav_menu, and the Archives widget has archives.
In the example below we check if the widget is a Navigation widget. If it’s not, the function is cancelled with a return. Only Navigation widgets will get the custom checkbox:
add_action('in_widget_form', function($widget, $return, $instance) {
	if ($widget->id_base != 'nav_menu') {
		return;
	}

	?>
	<p>
	...
You should get the setting in admin like so:
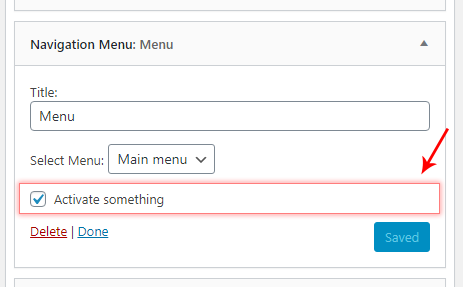
So the setting has been added, however at the moment your settings are not being saved. Let’s fix that.
Saving your custom settings
We need to hook into the widget’s update() function in order to update our custom settings.
For this we use the filter widget_update_callback. The process of saving our settings is exactly like you’d do when you write a widget class. The filter provides three parameters; the first is the instance array that will be saved. The second parameter is the state that has been posted upon saving the widget, and the third is the old state. We need to make sure to fetch our new values from the second parameter and add them to the first.
This is how we would update the state of our checkbox; as we want to save a true or false value:
add_filter('widget_update_callback', function($instance, $new_instance, $old_instance) {
	$instance['awp-custom-setting'] = isset($new_instance['awp-custom-setting']);
	return $instance;
}, 10, 3);
Remember to adjust the input names to your own setting names. If you are adding several inputs, you need to repeat this for each.
Now you should see that your custom settings are being saved in admin!
Using saved custom widget settings
As mentioned earlier this part really depends on what you want your settings to do. It’s unfortunately not as straight forward because most widgets don’t add filters or hooks in their outputs. Let’s start with something simple; avoid rendering the widget depending on the settings.
Prevent rendering widget depending on custom setting
Say you are adding settings for when the widget should be visible; for example hiding it in certain templates (hide in search results template, but show in frontpage and single), or react to other WordPress states.
For this we can use the filter widget_display_callback. All we need to do is check the provided instance parameter for our setting, and return false if we don’t want to render the widget.
This simple code will avoid rendering the widget if the custom checkbox we added above is checked:
add_filter('widget_display_callback', function($instance, $widget, $args) {
	if ($instance['awp-custom-setting']) {
		return false;
	}
	return $instance;
}, 10, 3);
You probably want to compare other states. This is a simple example where our checkbox is a checkbox for “Hide in single posts views”. We simply check if we are currently at any single post view with is_singular() and if the checkbox is checked, we return false.
add_filter('widget_display_callback', function($instance, $widget, $args) {
	if (is_singular() && $instance['awp-custom-setting']) {
		return false;
	}
	return $instance;
}, 10, 3);
Modifying existing widget’s settings or output
A powerful filter to utilize for playing around with existing widgets is dynamic_sidebar_params. Take a look at the documentation page to see what parameters you can modify. For example you can add custom classes, you can modify the before_widget, after_widget or the before_title and after_title HTML strings. However this applies to all widgets, also admin and frontend. And with this filter you don’t have access to the widget’s instance (saved settings) or widget settings (e.g. type of widget).
Obviously we need at to least check our custom settings. So we need to do quite some code in order to fetch the values we need.
The first thing we can do is accessing a global variable $wp_registered_widgets. This is an array that contains all registered, available widgets. Using that registry we can use the filter’s parameter to find the specific widget we currently are at. Once we’ve found the current widget we have access to the widget parameters, such as id_base – which as we saw earlier tells us the type of widget.
add_filter('dynamic_sidebar_params', function($params) {
	global $wp_registered_widgets;

	$this_widget_id = $params[0]['widget_id'];  // Current widget ID
	$this_widget = $wp_registered_widgets[$this_widget_id];
	$widget_object = $this_widget['callback'][0];  // Current widget object

	// With $widget_object we have access to e.g. id_base for checking type of widget
	if ($widget_object->id_base != 'nav_menu') {
		return $params;
	}

	return $params;
});
As you can see in line #9 we can finally check for what type of widget we are currently at. In the code above I return if the widget type is not a Navigation widget as our custom setting was only added for those widgets.
Fetching saved widget settings
But we also need to fetch the saved settings per widget (including our custom setting). All widgets’s saved settings are store in the options database grouped by the type of widget. Using a property in the widget registry we can use get_option() to fetch the saved settings for the current widget type. The return will be an indexed array where we need to use yet another perameter from the filter to find the current index (because you can add multiple of the same widget type in the same or different sidebars). It’s easier to show with code than explaining it:
	...
	if ($widget_object->id_base != 'nav_menu') {
		return $params;
	}

	$all_settings = get_option($widget_object->option_name);
	$saved_settings = $all_settings[$params[1]['number']];

	if ($saved_settings['my-custom-thing']) {
		// Do your thing
	}

	return $params;
});
Finally we get ahold of the widget’s saved settings! In the example code above, at line #9, we check whether or not our custom checkbox is checked.
Examples
At this point, it’s up to you what you want to do. You can for example render an output after widget title, but before widget content:
	...
	if ($saved_settings['my-custom-thing']) {
		$params[0]['after_title'] .= '<div>This appears before widget content</div>';
	}
	...
For more real use-cases you’d normally solve most by adding certain filters at this point, by calling add_filter() at this point.
Below is an example of modifying the Navigation menu arguments by adding a filter if our setting was checked. If it was unchecked, we make sure the filter is removed. The filter for modifying the arguments for rendering a Navigation menu is widget_nav_menu_args. In the code below I’ve defined a function to apply to this filter which adds a new argument to the menu arguments; a walker:
	...
	if ($saved_settings['my-custom-thing']) {
		add_filter('widget_nav_menu_args', 'awp_add_menu_walker', 10, 3);
	} else {
		remove_filter('widget_nav_menu_args', 'awp_add_menu_walker', 10);
	}
	return $params;
});

function awp_add_menu_walker($nav_menu_args, $nav_menu, $args) {
	$nav_menu_args['walker'] = new AWP_Custom_Walker();
	return $nav_menu_args;
}
The code above is a example of a use-case where the custom checkbox controls whether or not to apply a menu walker to the menu. Excellent if you want all menus to render normally but want the option for specific menu widgets to render differently. What the walker does with the menu output is up to you.
Hopefully this is enough for you to figure out how to code what you want to do. It really depends on what you want to do and what type of widget you are working with. As mentioned above usually most of the modifications can be solved by adding filters to do your thing in dynamic_sidebar_params.
Full example: Custom checkbox setting on Navigation widgets for applying a menu walker
Here is the full code for adding a custom checkbox to all WordPress’ Navigation menu widgets for using a registered menu walker. (Walker code not included)
// Add custom setting to menu widgets
add_action('in_widget_form', function($widget, $return, $instance) {
	// Add setting only to menu widgets
	if ($widget->id_base != 'nav_menu') {
		return;
	}

	?>
	<p>
		<input type="checkbox" class="checkbox" name="<?php echo $widget->get_field_name('activate-walker'); ?>" id="<?php echo $widget->get_field_name('activate-walker'); ?>" <?php checked(isset($instance['activate-walker']) ? $instance['activate-walker'] : 0); ?> />
		<label for="<?php echo $widget->get_field_name('activate-walker'); ?>"><?php __('Activate walker', 'txtdomain'); ?></label>
	</p>
	<?php
}, 10, 3);


// Update custom setting
add_filter('widget_update_callback', function($instance, $new_instance, $old_instance) {
	$instance['activate-walker'] = isset($new_instance['activate-walker']);
	return $instance;
}, 10, 3);


// Filter sidebar params to add filter if custom setting was activated
add_filter('dynamic_sidebar_params', function($params) {
	global $wp_registered_widgets;

	$this_widget_id = $params[0]['widget_id'];
	$this_widget = $wp_registered_widgets[$this_widget_id];
	$widget_object = $this_widget['callback'][0];

	// Bail if not a menu widget
	if ($widget_object->id_base != 'nav_menu') {
		return $params;
	}

	$all_settings = get_option($widget_object->option_name);
	$saved_settings = $all_settings[$params[1]['number']];

	if ($saved_settings['activate-walker']) {
		add_filter('widget_nav_menu_args', 'awp_add_menu_walker', 10, 3);
	} else {
		remove_filter('widget_nav_menu_args', 'awp_add_menu_walker', 10);
	}

	return $params;
});


// Filter nav menu arguments to add walker
function awp_add_menu_walker($nav_menu_args, $nav_menu, $args) {
	$nav_menu_args['walker'] = new AWP_Custom_Walker();
	return $nav_menu_args;
}
Conclusion
Hopefully this post has been helpful in either solving your needs or giving you some pointers in how you can go about doing what you need to do!