
In this lesson we learn about how translation (or otherwise known as i18n) in WordPress works and how to make the necessary adjustments in our templates. We will also learn how to set up PoEdit properly to create a translation file for our theme, ready to be translated into different languages.
Why bother with adding translation support?
All themes, at least ones that goes public for use of other people than the developer, should be available for translation. This is called internationalization (i18n in short), and allows people to translate texts you add in your theme into another language.
The way it works is that you as a theme author or plugin developer wrap all your texts (such as “Read more”, “No posts”) in certain functions. These functions make it so that WordPress is able to pick these up and inject a translation if it exists. Inside your theme (or plugin) you can add files of a certain filetype for each translated language, or make sure other people are able to create their own translation in their own language.
This is very useful for people who want to use WordPress and your theme (or plugin) in a different language than the origin language it was written in (which is usually English). But it can also be utilized for changing certain texts to something different within the same language.
If you are interested in the topic, WordPress Codex has a long and good documentation guide on i18n for developers.
Implementing i18n in our theme
We have already done the first part in the previous step of this theme tutorial series, where we added load_theme_textdomain in our theme’s setup function. In case you forgot, this is what we added:
load_theme_textdomain('wptutorial', get_stylesheet_directory() . '/lang');
The first argument is the handle, this is an unique string which you will use to group up all texts that belongs to your theme. You will repeat this handle every time you make a text translatable. The second argument tells WordPress where the translation files are. We defined them to reside in a subfolder ‘lang‘ in our theme directory.
Don’t worry if this folder doesn’t exist or doesn’t contain any files – nothing will crash. If WordPress doesn’t find the folder nor the correct translation files, it will default back to the texts we have in theme.
The next step is going through all our code and find any text output that should be translatable. It’s good practice to make sure we cover absolutely all texts. Nothing is more annoying than using a theme or plugin where the author hard coded texts making it impossible to translate or change in any way.
How to make texts translatable
What we do with all texts is putting them inside one of WordPress’ gettext-functions, which most commonly are _e() or __(). The first is an underscore with “e” which is used when you want to echo the text at the same time. The second is two underscores and is used when you don’t want to echo it but store it or use it in a variable.
The gettext-functions take two parameters; first the text itself, and secondly the handle you defined in load_theme_textdomain. In this case it’s ‘wptutorial‘.
For example, if you have something like this:
echo 'Read more';
You’ll need to replace it with:
_e('Read more', 'wptutorial');
And similarly for storing into a variable;
$myvariable = 'Read more';
It needs to be written like this:
$myvariable = __('Read more', 'wptutorial');
Now we need to find all texts in our templates! If you have followed this tutorial to a “T” it’s not many. We have some strings in index.php and some in single.php.
Adding translation support in our theme
Let’s start with index.php and locate the “No posts, sorry” message we added if the loop didn’t contain any posts. We wrap this text inside _e() because we still want to echo it. So this is what we get:
index.php
...
} else {
	?><p><?php _e('No posts, sorry.', 'wptutorial'); ?></p><?php
}
...
Because you used _e() you should see no change when you hit refresh on frontpage or archive. But under the hood, this text is now translatable!
We have this same text in our single.php and page.php. Update these the same way as we did in index.php. We did add some more texts in single.php, so here is how it looks after making all texts translatable:
single.php
...
		<?php the_category(); ?>
		<p><?php _e('Posted', 'wptutorial'); ?>: <?php the_date(); ?> <?php _e('at', 'wptutorial'); ?> <?php the_time(); ?></p>
		<p><?php _e('Author', 'wptutorial'); ?>: <?php the_author(); ?></p>
	</article>
	<?php endwhile;
} else {
	?><p><?php _e('No posts, sorry.', 'wptutorial'); ?></p><?php
}

...
From now on all texts we add in our theme we make sure to wrap them inside __() or _e().
Translation files
There are two ways of providing translation files to your theme;
- Provide a
.pot-file - or provide a pair of
.poand.mofiles.
The .pot-file is recommended for a theme that you sell or give away to other users, because with this file it’s very easy to generate a translation file for a new language. However it’s not easy (or free) to create one of those files. If you are familiar with WP-CLI (command line WordPress) or Grunt, you can follow the guidelines in WordPress’ documentation here. If not, the other alternative might be for you.
The files .po and .mo work together. WordPress requires a .mo for translation of texts, but this file is not humanly readable. Therefore we have the .po file which is readable for us. With the right software it generates the .mo file whenever you make changes.
The disadvantage of .po and .mo files is that you need to generate one pair for each language, and once you have translated it to a language, there is no easy way to empty all the translations in order to make another new language.
You need a program to edit .pot and .po files. The most common one is PoEdit. PoEdit is free and works for both iOS and Windows. But some advanced features (such as generating a .pot-file) unfortunately requires a paid version. We will use the free version to make a .po file for our theme.
Download and install PoEdit in order to follow the rest of the tutorial.
Creating a .po file for our theme with PoEdit
1. Open up PoEdit, and click File > New…
2. You will be prompted to choose a language. Choose your desired language, for example English.
3. Hit Save (Ctrl+S). Locate your theme folder and enter the /lang/ subfolder. (If you didn’t create it in last step, create it now). The name of your file is critical. For themes it should be named just your language code. For American English it would be en_US, for Norwegian it’s nb_NO. Google it or refer to this overview to find your language code. We’ll name it en_US.po.
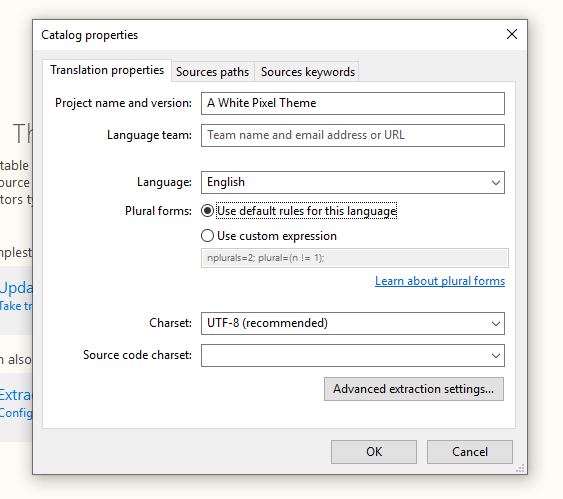
4. In the menu click Catalog > Properties…
5. In the first tab you might fill in some information such as your project (theme) name, or change the language – but it’s not necessary. I recommend that you keep charset in UTF-8 as this is what we write for WordPress.
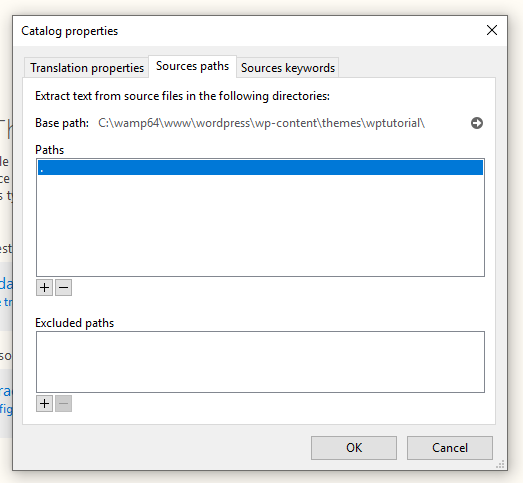
6. Click the tab Sources paths. Here you will need to define which folders the file should look for translatable texts. The paths are relative, and because we already saved it in a subfolder of our theme, we know it needs to go up one directory. Hit the + button below the Paths box and choose Add folders. Choose your theme directory. This should add a path element “.” (go up one folder). Doublecheck that “Base path” refers to your root theme directory.
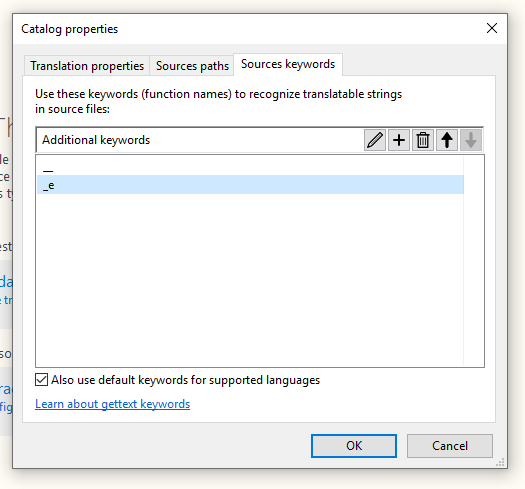
7. Click the next tab, “Sources keywords”. In here you need to tell PoEdit which functions you have used for translatable texts (for example __, _e, esc_html_e and so on). Click the + button to add each function, and write them without “()”. It’s up to you if you want to cover all your bases and add all WordPress’ gettext functions, but in this tutorial we know we have used only two. So we add two elements; __() and _e(). Add the functions without any paranthesis.
8. Hit OK.
9. All that remains is to tell PoEdit to scan the provided paths for functions using __() and _e() (or whichever you provided). You do this by hitting the button “Update from code”. (The Windows version has the text on the button but the iOS version doesn’t – so for iOS you need to hit the button which usually is the last one in the toolbar; a file icon with a “redo” icon on top. Click the “Update from code” button and you should see all texts listed out with an interface for translation:
Nice!
Generated translation files
Now you can use PoEdit to translate each string, but we won’t do that here since it’s no point translating English to English. Remember to hit Save in order to update and generate a .mo file, and every time you add another text in your theme, you need to hit “Update from code” button again. Then the new changes in your templates will appear.
If you check the /lang subfolder in your theme directory folder you should see two files; the .po file we just made, and a .mo file with the same name, generated by us saving in PoEdit.
You can make a copy of the en_US.po file and rename it into a different language code. But remember that PoEdit doesn’t offer a simple way to clear all translated strings; you’d have to clear one by one. This is the reason this sucks for users who want to translate your theme in a different language. So if you have the possibility to make a .pot file, you should do so.
WordPress will search for translation file depending on the language defined in admin menu Settings > Site Language. If you added a different language than English you could test it out by switching site language and see if your translation appears!