
In this part we’ll look at how to define attributes, fetch their values and update them. With attributes we can accept input from the editor, save it and output it however we choose. In the previous step we looked at WordPress components, where to find them and how to implement them. In this post we’ll add props for making the connection to attributes – the saved data.
Defining attributes
Attributes are added as objects in an array to the attributes property in registerBlockType(). Each attribute’s key is the attribute name, and you must have the property type as a minimum.
The type property can be any of the following; null, boolean, object, array, number, string, or integer.
You can optionally provide the property default to define the starting value of your attribute. If you don’t provide a default, the attribute will default to null.
Another attribute property is source that works together with the selector property, but these are finicky things that we’ll look at in detail further down below.
For example defining two attributes; exampleText as string, and postIds as an array, would look like this:
const { registerBlockType } = wp.blocks;
registerBlockType('awp/firstblock', {
	title: 'My first block',
	category: 'common',
	attributes: {
		exampleText: {
			type: 'string',
			default: ''
		},
		postIds: {
			type: 'array'
			default: []
		}
	},
	edit: (props) => {
	...
Anything you need saved for your block (input from the user/editor) requires an attribute. It’s up you how you structure your data, by defining separate attributes for each or bunch them all up in an object. It will just be a difference in how you fetch their data and how you update them.
Getting attribute values
Attributes are available as props to your block’s edit and save functions. If you have followed this series from previous step, remember that we updated the functions to pass props as parameter.
It’s common to destructure attributes out of props as you’d usually refer to them often. For example outputting an attribute called exampleText would look like this:
edit: (props) => {
	const { attributes } = props;
	return <div>{attributes.exampleText}</div>
},
Updating attribute values
In order to update attributes we have a method available in props, called setAttributes(). This function accepts an object where you can add any attribute you wish to update. You can update only one attribute, more or all at once. If you have multiple attributes defined and call setAttributes() to update only one of them, the other ones are not touched.
If you have experience with React, you’ll probably immidiately recognize similarities between setAttributes() and setState(). They work exactly the same, but the difference is that state in React is just something stored locally in that component, and attributes are actually saved as data outside the component.
For updating an attribute, you’d usually destruct the function from props, and call it like so: Below we update exampleText attribute to be “Hi”.
const { setAttributes } = props;
setAttributes({ exampleText: 'Hi' });
Naturally you would run the setAttributes() from within some action. A common example is inside the onChange prop on some kind of input field that’s used for storing the value of exampleText attribute.
Make sure to save attributes in the type you have defined on the attribute. You won’t have any luck trying to save objects into a string attribute for example.
Let’s try it out in practice! Initiate npm run start if you haven’t already.
Displaying an attribute in a custom text input and updating the attribute’s value
In the previous step we added some components into edit, e.g. a text input, but nothing was stored. Let’s add an attribute and one text input for it in our block. We will both make sure the text input shows the current value, and whenever the input is changed we update the attribute.
Adding the text input and its onChange prop
const { registerBlockType } = wp.blocks;
const { TextControl } = wp.components;

registerBlockType('awp/firstblock', {
	title: 'My first block',
	category: 'common',
	attributes: {
		exampleText: {
			type: 'string',
			default: ''
		}
	},
	edit: (props) => {
		const { attributes, setAttributes } = props;
		return (
			<div>
				<TextControl
					value={attributes.exampleText}
					onChange={(newtext) => setAttributes({ exampleText: newtext })}
				/>
			</div>
		);
	},
	save: () => {
		return <div>:)</div>
	}
});
We destructure attributes and setAttributes from props as we’ll use both. Then we use a TextControl component from WordPress’ wp.components package. We pass two props to it; value will set the input’s value (both initially and while we type) and an action on the input’s event onChange.
In value we set it to the value of our attribute; attributes.exampleText. In the onChange event we run a function, passing the typed value of our input as parameter, newtext (the input value is a prop that is returned from the component). In that function we call setAttributes() and update the attribute exampleText to what was typed in the input.
This is basic React – apart from the fact that we work with attributes and not state. If the above confused you I recommend looking at a quick tutorial in React, as these will probably explain this way better than me!
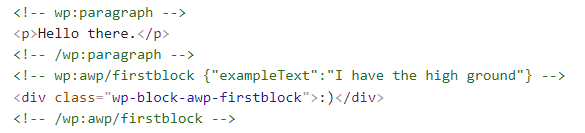
Refresh your editor and see how the block works! You should get a standard text input to type things in, and it will be saved whenever you hit Save/Update in post edit.
The result in frontend and in the database
If you view your post in frontend it should still echo a div with “:)” because that’s what we still have in our save function. But something has happened in behind the scenes! Our block’s comment block now contains the value of our attribute in JSON.
Obviously we have access to the attributes in save as well, from props.
Displaying the input’s value in save
Let’s display the value of the attribute inside a div in our save function:
save: (props) => {
	const { attributes } = props;
	return <div>{attributes.exampleText}</div>
}
And this is the gist of it actually. You decide what attributes you need to save what you want in your block. In edit you’ll render ways for the user to input, taking care that the current values are displayed and update them whenever they change. And in save you extract the saved attributes and render the output however you’d like.
We will touch upon a lot more different components and attributes as we go in this tutorial series. But let’s look at one other component in this post in order to see what the attribute property source is all about.
RichText and the attribute property source
WordPress’ RichText component gives you a “borderless” textarea with text formatting support. You might prefer using this instead of a (ugly?) standard text input or textarea. But keep in mind that RichText must be handled a little differently as there are several props you need to be aware of, and there’s a difference in how we get ahold the value in our save function.
Adding a RichText component
The simplest form of RichText is implementing it as you would with a text input:
const { registerBlockType } = wp.blocks;
const { RichText } = wp.blockEditor;

registerBlockType('awp/firstblock', {
	...
	attributes: {
		myRichText: {
			type: 'string',
			default: ''
		}
	},
	edit: (props) => {
		const { attributes, setAttributes } = props;
		return (
			<div>
				<RichText
					value={attributes.myRichText}
					onChange={(newtext) => setAttributes({ myRichText: newtext })}
				/>
			</div>
		);
	},
	...
We destructure the RichText component from the wp.blockEditor package, but otherwise the above is identical to what we did with the standard text input.
Handling save with RichText
However in the save function you need to use the RichText component again to get the value of the attribute. We call RichText.Content and setting the prop value to our attribute:
save: (props) => {
	const { attributes } = props;
	return (
		<div>
			<RichText.Content
				value={attributes.myRichText}
			/>
		</div>
	);
}
This will output whatever was typed in the RichText in editor directly without any HTML wrapped around.
When you work with RichText you most likely want to control the HTML wrapper around the text, for example a <p> or a <h2>, both in frontend and in editor. For that we can use a prop called tagName.
The component RichText allows several other props as well. You can define a placeholder text that’s being shown (faded) when it’s empty with the placeholder prop. The component also allows you to control which formatting options the field allows (which buttons it shows in the toolbar).
RichText with tagName
With the prop tagName you can predefine which HTML tag its output gets wrapped in. When you use tagName you should use the same tagName prop and value in both edit and save.
Say you want to put your attribute value in a <h2>, which will in the editor force any input to be a h2. In edit you can do:
<RichText
	tagName="h2"
	placeholder="Write your heading here"
	value={attributes.myRichText}
	onChange={(newtext) => setAttributes({ myRichText: newtext })}
/>
And in save:
<RichText.Content
	tagName="h2"
	value={attributes.myRichText}
/>
The above will now output whatever was typed in the RichText area inside a <h2> tag.
Using source
Obviously you can combine multiple richtext for a block, for example one for heading and one for a paragraph. Just remember that each will need its own attribute. For example:
attributes: {
	myRichHeading: {
		type: 'string'
	},
	myRichText: {
		type: 'string'
	}
},
edit: (props) => {
	const { attributes, setAttributes } = props;
	return (
		<div>
			<RichText
				tagName="h2"
				placeholder="Write your heading here"
				value={attributes.myRichHeading}
				onChange={(newtext) => setAttributes({ myRichHeading: newtext })}
			/>
			<RichText
				tagName="p"
				placeholder="Write your paragraph here"
				value={attributes.myRichText}
				onChange={(newtext) => setAttributes({ myRichText: newtext })}
			/>
		</div>
	);
},
save: (props) => {
	const { attributes } = props;
	return (
		<div>
			<RichText.Content
				tagName="h2"
				value={attributes.myRichHeading}
			/>
			<RichText.Content
				tagName="p"
				value={attributes.myRichText}
			/>
		</div>
	);
}
However you will by now start encountering some problems. Even though you can do text formatting in editor, nothing (or some) of your formatting will not be saved. When you view the post in frontend, it will simply come out as h2 and a p, without any formatting you’ve done (italic, bold, link). Not even the comment block for your block contains the formatting. This is the tricky thing with RichText. To solve this we need to work with the attribute property source.
The source property allowing WordPress to extract and interpret the content directly from the post content. If an attribute has no source set, it will be saved in and extracted from the HTML comment block.
When working with RichText we usually set source to html, which uses WordPress’ libarary to parse HTML markup. The property source works together with another attribute property; selector which defines which HTML tag it should extract from.
As an example we set source as html on our paragraph RichText, and set selector as p (otherwise it defaults to root of block the block).
attributes: {
	...
	myRichText: {
		type: 'string',
		source: 'html',
		selector: 'p'
	}
},
Now our second RichText should successfully save all its text formatting. You will also notice that the comment block now only displays the myRichHeading attribute in JSON. The attribute myRichText has completely disappeared from the comment block. This is because with source WordPress now parses the post content instead of the comment block for the attribute value.

To be perfectly honest I haven’t worked as much with the source attribute at all and would recommend avoiding it if you can. WordPress’ documentation explains somewhat more about source and attributes of you want to check it out for yourself.
In this post we’ve learned the basics about attributes; how to define them, update them, and output their values. In the next steps we’ll look at more different components and how to add settings outside the block content itself; in the toolbar and the editor sidebar (called Inspector).