
WordPress’ new editor Gutenberg gives the author great flexibility to create rich content. But in some cases you might need to limit this a little, either as a site webmaster or as a theme developer. In this post we’ll look at how we can provide block limitations in Gutenberg using PHP.
There are built-in functionality to set some limitations in blocks that many are not familiar with, yet. This can be useful when you need certain posts to follow the same design or content, or if you want to help non-technical authors to not be overwhelmed by the number of blocks in Gutenberg. Another example include automatically add the necessary Ad blocks (if you have an Ad plugin) inbetween texts in posts. You can either force this or use these techniques to help the authors remember to add them.
In this post we’ll look at two ways you can control blocks in WordPress Gutenberg. One way is limiting what kind of blocks can be added. In other words remove certain block types you don’t want available. We can do this specifically by post type or globally. The other way is using block templates. WordPress offers you to decide a set of predefined blocks when you create a new post. This is done per post type. With block templates you can offer the author the inital blocks to help them on their way to write the post, or you can lock the blocks in place so the author can’t change their position or add new ones.
You can do both of these with either PHP or Javascript. This guide will cover the PHP way.
Remove block types
Blacklist
There’s a PHP filter in WordPress called allowed_block_types. This filter gives you two parameters; an array of all blocks and the post object. All we need to do is managing the array before returning it. And because we also get the post object in the filter, we can also add rules by post type or other post meta information.
The array of blocks consists of strings of the block’s namespaced names. All blocks in WordPress require a prefixed namespace before the block name. For WordPress core blocks the namespace is “core/” and for WordPress embed blocks the namespace is “core-embed/“. For example the heading block has the name “core/heading” in this array. I created a complete overview of all the block types’s names in my post on How to access and parse a post’s blocks.
Here’s a quick example of using the filter to remove all blocks except the paragraph. This will apply to all post types.
add_filter('allowed_block_types', function($block_types, $post) {
	return ['core/paragraph'];
}, 10, 2);
If you add this code in your theme’s functions.php or plugin file, the result is Gutenberg completely disallowing any other blocks than paragraph. You won’t even be able to see any other blocks, neither can you try to lure them out by typing “/” in the post (block shortcut) or searching for them.
We can define the blocks we want to keep or remove by post type. We simply check the property post_type on the post object. In the code example below we define a new array of the blocks we want to allow and add this rule only for the custom post type ‘book‘.
add_filter('allowed_block_types', function($block_types, $post) {
	$allowed = [
		'core/paragraph',
		'core/heading',
		'core/image'
	];
	if ($post->post_type == 'book') {
		return $allowed;
	}
	return $block_types;
}, 10, 2);
With the above code you get all blocks when editing posts and pages, but when editing the custom post type ‘book‘, you can only add paragraphs, headings and single images.
Use your imagination to add your own rules. Because we have the post object we can access most of the information we would need. Perhaps you need to limit the block choices by a post meta value? For example by chosen page template, chosen post category or something else.
A note on removing block categories:
WordPress has a filter block_categories for adding and removing block categories as well. If you figure out it’s easier to simply remove a whole block category than using the filter above to remove one by one, I don’t recommend it. Removing a block category and not its blocks will cause a Javascript error in the editor, because Gutenberg will still attempt to add blocks to a category that no longer exists.
When you remove blocks using the allowed_block_types filter and as a result of this a block category becomes empty, Gutenberg will automatically hide the category from the block selector anyway.
Whitelist
As far as I can see you can only whitelist (decide which ones to remove, as opposed to decide which one to keep) blocks by unregistering the blocks at a certain point. And you have do to it with Javascript and not PHP.
I won’t go into detail on this, but you will need to enqueue a Javascript file loaded in init or enqueue_block_editor_assets hook, with wp-dom-ready and wp-blocks as dependency. Inside the script you can set up a variable of the one(s) you want to remove, following the same rules for namespaces and block names above. And for each block name you call the function unregisterBlockType() from the wp.blocks package. Usually you would need to do this inside a function on wp.domReady() to ensure the script load order is correct.
Something like this:
var removeBlocks = [
	'core/paragraph',
	'core/heading',
	'core/image'
];

wp.domReady(function() {
	removeBlocks.forEach(function(blockName) {
		wp.blocks.unregisterBlockType(blockName);
	});
});
Removing block types is one way of controlling blocks in Gutenberg. Let’s look at the other, perhaps more fun way to control blocks: block templates.
Block templates
Another way of controlling Gutenberg blocks in WordPress is by using block templates. WordPress has functionality that allows you to populate new posts with a set of predefined blocks. This can be useful for helping authors by showing them a suggestion of block structure. You can also choose to lock these prefilled blocks, thus not allowing the authors to reorder or add other blocks. This is useful for when you want posts to have a specific structure and design – for example making sure all posts of that post type has their information structured the exact same way.
We can add block templates with a new parameter to the register_post_type() function that is used for registering custom post types (note: the new parameter has not yet been added to the documentation). You can also add or adjust the parameters on existing post types such as posts and pages – see below on how.
The new parameter to register_post_type() is ‘template‘. As value to ‘template‘ you need to provide an array of blocks. Each block must be an array as well. As minimum you need to provide the first array element; the block name (e.g. core/paragraph). You can optionally add a second array element for attributes, and a third array element for nested blocks (e.g. Cover, Columns blocks). It’ll become more clear when you see the code.
Let’s start simple. Assume we have a register_post_type() function call to register a custom post type ‘book‘. We want to prefill all new posts of this post type with a paragraph block with a placeholder telling the author what he or she should write.
add_action('init', function() {
	register_post_type('book', [
		'label' => __('Books', 'txtdomain'),
		'public' => true,
		...
		'template' => [
			['core/paragraph', ['placeholder' => __('Write your intro here...', 'txtdomain')]],
		],
	]);
});
Note that the attributes array (with ‘placeholder’ in it) is optional. Now, with this ‘template’ parameter whenever we create new posts, it will be created with a paragraph block that has the placeholder “Write your intro here…”.
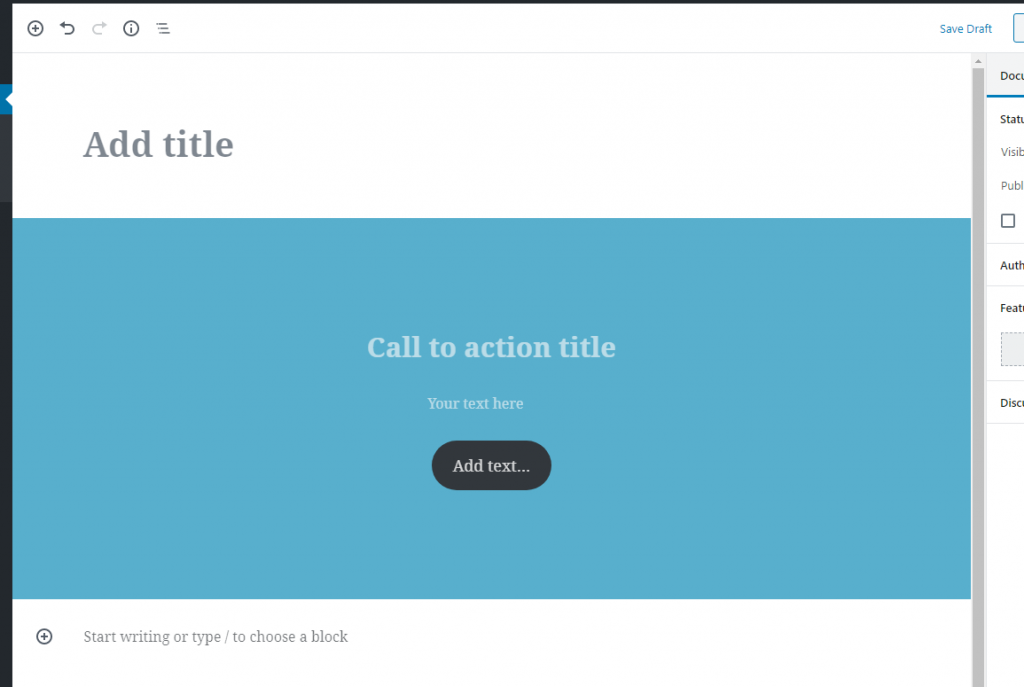
Let’s look at a more complicated example: nested blocks. Say we want to add a Cover block that has a heading block, paragraph and a button inside it, aligned to the center. The title and paragraph will have a placeholder:
'template' => [
	['core/cover', ['align' => 'full', 'overlayColor' => 'blue-profile'], [
		['core/heading', ['align' => 'center', 'placeholder' => __('Call to action title', 'txtdomain')]],
		['core/paragraph', ['align' => 'center', 'placeholder' => __('Your text here', 'txtdomain')]],
		['core/button', ['align' => 'center']]
	]],
],
The image below shows what we will get when we create new book posts. It looks less intimidating than a blank canvas, right?
Keep in mind that the attributes are different in each block type, and may also differ in your setup. In the code example above I add two attributes to the Cover block; block alignment to “Full Width” and overlay color to a predefined color from a custom color palette.
The block alignments “Wide Width” and “Full Width” must be specifically supported in your theme. I have a post that explains how to add support in your theme for additional block alignments if you are not familiar with this. Secondly my theme is providing a custom Gutenberg color palette where one of the palette colors is named ‘blue-profile’. This will probably not exist in your code. The above link also explains this if you are unfamiliar with custom Gutenberg palette as well.
The reason I choose to provide an overlay color as attribute is because of how the Cover block behaves. When you create a Cover block it starts by asking you to choose between setting a background image or pick a background color. Until the author actively choose one of these, the Cover block hides any content it has (the heading, paragraph and button we added)! They will just suddenly pop up after choosing an image or color. Therefore, to avoid confusion, I’ve preselected a background color so that the author sees all of the blocks inside right away. The color can always be changed in the Inspector (sidebar) anyway.
Locking the block template
With the provided block template the author can rearrange and remove any of the prefilled blocks, as well as add new blocks anywhere they’d like. If you want to avoid this there’s another parameter to register_post_type(): ‘template_lock‘.
The ‘template_lock‘ parameter accepts two values; ‘all‘ or ‘insert‘.
Setting ‘template_lock‘ to ‘all‘ completely blocks the authors from rearranging, removing or adding new blocks to your block template. They can only edit the contents and settings of the blocks defined as block template. This is useful in cases where you want all post types to consist of the same blocks in the same order – no more and no less.
Using ‘insert‘ for ‘template_lock‘ allows the authors to rearrange the blocks in the block template. But the authors still can’t add new blocks or delete any of the blocks.
Here’s how you would completely lock the block template for the custom post type ‘book‘:
add_action('init', function() {
	register_post_type('book', [
		'label' => __('Books', 'txtdomain'),
		'public' => true,
		...
		'template' => [
			['core/cover', ['align' => 'full', 'overlayColor' => 'blue-profile'], [
				['core/heading', ['align' => 'center', 'placeholder' => __('Call to action title', 'txtdomain')]],
				['core/paragraph', ['align' => 'center', 'placeholder' => __('Your text here', 'txtdomain')]],
				['core/button', ['align' => 'center']]
			]],
		],
		'template_lock' => 'all',
	]);
});
Using a locked block template in Gutenberg will look like below. Notice that the action icons for rearranging blocks are missing as well as removing block links in the menu are missing. There’s also no action icons for adding new blocks (the little “+”) anywhere.
Adjusting block templates for existing post types
If you want to use block templates on posts or pages you can do this as well. Hook a function onto init and use get_post_type_object(). Provide the post type you want as parameter (either ‘post‘ or ‘page‘). This returns an object that you can assign the property ‘template‘ and ‘template_lock‘ onto.
This is an example of adding the same block template and lock property as above onto pages:
add_action('init', function() {
	$page_post_type = get_post_type_object('page');
	$page_post_type->template = [
		['core/cover', ['align' => 'full', 'overlayColor' => 'blue-profile'], [
			['core/heading', ['align' => 'center', 'placeholder' => __('Call to action title', 'txtdomain')]],
			['core/paragraph', ['align' => 'center', 'placeholder' => __('Your text here', 'txtdomain')]],
			['core/button', ['align' => 'center']]
		]],
	];
	$page_post_type->template_lock = 'all';
});
Conclusion
In this post we’ve learned how to achieve greater control of blocks in WordPress Gutenberg editor. There’s many benefits of doing this, especially in combination with custom post types that need to follow a specific structure. Using the techniques above will help you streamline your process more, both as a webmaster (helping people to write better posts), and as a theme developer (ensuring common design). Locked block templates might be a different solution than custom post templates and post meta.
Customizing block templates is still a pretty hidden feature of Gutenberg at the moment. But I’ll expect it to change as Gutenberg develops and gets a more familiar place within WordPress.