
In this Gravity Forms tutorial we’ll learn three things:
- How to add a custom input to any field type of your choice
- How to add custom settings to your form
- And finally how to remote post submitted values for specific fields after each form submission.
This post assumes that you want to add functionality to Gravity Forms to send a remote post request after each form submission. Inside the remote post you’ll send values from the form, which are customizable by additional settings in the form editor. Common examples of where this would be useful are submitting e.g. name and email to a Mailchimp newsletter list, or really any other third party integration.
The way to solve this in practice is first adding custom settings to each field, where the editor can type in key names. The key and their submitted values will be sent to a third party URL after each form submission. We will also add a setting so you can choose for each form to activate this type of third party submission.
All of the code below can be placed in your theme’s functions.php or plugin code.
Adding a custom input to fields
The first step is adding the input to fields in the field editor where you can type in the key name for this value. We will only include and submit values where this input has been filled in.
Choosing where to place your input
Gravity Forms offers hooks that we can use to add custom stuff into field editor. The hook name depends on which tab you want your field to appear in.
- “General” tab:
gform_field_standard_settings - “Appearance” tab:
gform_field_appearance_settings - “Advanced” tab:
gform_field_advanced_settings
In each hook you’ll have two parameters; position and form ID. Each built-in Gravity Forms setting has a fixed position number. You can compare this number to decide precisely where you want your custom HTML or input to be. Listing all settings and their position would be way too long in this post. But Gravity Forms adds their settings in increments of 5. For example in General tab the “Field label” is at position 0 and “Description” is at position 10. Putting your HTML at position 10 will make it appear after Description. Don’t compare position to any number that is not a multiplier of 5.
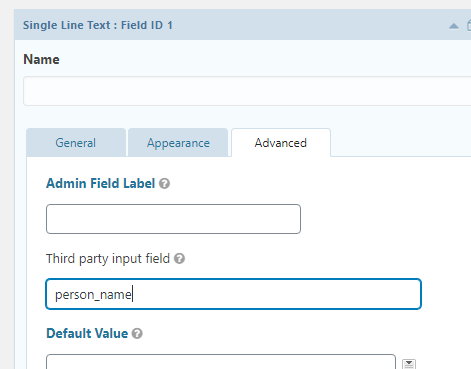
I’m adding my custom field in the Advanced tab, at position 50, which is right after “Admin Field Label” input.
add_action('gform_field_advanced_settings', function($position, $form_id) {
	if ($position == 50) {  // right after Admin Field Label
		?>
		<li class="thirdparty_input_setting field_setting">
			<label for="field_admin_label">
				<?php _e('Third party input field', 'txtdomain'); ?>
			</label>
			<input type="text" id="field_thirdparty_input" onchange="SetFieldProperty('thirdPartyInput', this.value);" class="fieldwidth-3" />
		</li>
		<?php
	}
}, 10, 2);
Most of the code above is self-explanatory. I’m adding HTML in the same format as Gravity Forms would expect a setting to be in. However on the input itself you need to provide an onchange Javascript function. We simply tell it to run GravityForms’s function to save any changes made in our input. The property we provide in SetFieldProperty, thirdPartyInput, is important to remember, inside this key is where our custom input will be saved in Gravity Forms’s fields array when submitting.
Adding a tooltip (optional)
You can do another optional thing with your input; add a tooltip. If you want this, add this function call inside the code you just added and provide an (unique) key as string:
			...
			<label for="field_admin_label">
				<?php _e('Third party input field', 'txtdomain'); ?>
				<?php gform_tooltip('form_field_thirdparty_input'); ?>
			</label>
			...
And then add another function that hooks onto the filter gform_tooltips, and add your tooltip content to the corresponding key, like so:
add_filter('gform_tooltips', function($tooltips) {
	$tooltips['form_field_thirdparty_input'] = __('<h6>Third party input</h6>If you want to submit this field to third party, type in key name here. Remember to activate form submission to third party in form settings.', 'txtdomain');
	return $tooltips;
});
Adding a tooltip is completely optional, but a nice way of explaining to site owners what this input does. Modify the content to what fits your functionality.
Defining which field types to add your custom input
You might notice that your field is not appearing in any Advanced tab. This is because we need to tell Gravity Forms which field types we want this input to appear in. As default it won’t appear in any.
The way we do this is actually with Javascript. GravityForms has Javascript that automatically hides all settings, and then choose to display specific ones based on field type. So our field is there, but Gravity Forms has simply hidden it.
We hook onto gform_editor_js and we need do two things. First we decide which field types the input should appear in. And secondly we make sure that the input gets populated with its value on load.
I’m adding the input to field types text, textarea, email, phone, and number. Remember to consider how you are going to handle the values of the submitted fields. If you choose to allow this field for example on checkbox field type, then you must be able to parse and handle the submitted values correctly.
add_action('gform_editor_js', function() {
	?>
	<script type="text/javascript">
		// Add our setting to these field types
		fieldSettings.text += ', .thirdparty_input_setting';
		fieldSettings.textarea += ', .thirdparty_input_setting';
		fieldSettings.email += ', .thirdparty_input_setting';
		fieldSettings.phone += ', .thirdparty_input_setting';
		fieldSettings.number += ', .thirdparty_input_setting';

		// Make sure our field gets populated with its saved value
		jQuery(document).on("gform_load_field_settings", function(event, field, form) {
	        	jQuery("#field_thirdparty_input").val(field["thirdPartyInput"]);
	    	});
	</script>
	<?php
});
Now, finally, you should be able to see your custom input in Advanced tab, if the field is of any of the provided types. You’ll also see that it saved successfully and gets loaded with its saved value. Whenever the form is submitted from now on, if this input is populated, the form field’s array will contain the property thirdPartyInput.
Next step is adding a setting onto the form itself to activate submission to third party. This is optional but recommended. We want to avoid running unecessary code or submitting something to the third party when we don’t intend to.
Adding a custom setting to form settings
Adding custom settings to form settings is pretty simple. We need to hook onto the filter gform_form_settings and append our HTML with any inputs you wish, and then onto the filter gform_pre_form_settings_save and make sure our custom input(s) are saved onto the form object.
This is how you would add a custom setting to form settings:
add_filter('gform_form_settings', function($settings, $form) {
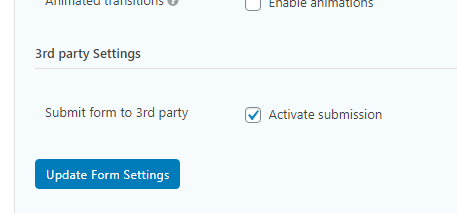
$settings[__('3rd party Settings', 'txtdomain')]['submit_3rd_party'] = '
<tr>
<th>'.__('Submit form to 3rd party', 'txtdomain').'</th>
<td>
<input type="checkbox" value="1" id="gform_submit_3rd_party" name="submit_3rd_party" '.checked(rgar($form, 'submit_3rd_party'), '1', false).' />
<label for="gform_submit_3rd_party">'.__('Activate submission', 'txtdomain').'</label>
</td>
</tr>
';
return $settings;
}, 10, 2);
The filter gform_form_settings expect keys to be a section label, and then an array for each setting. We add only one with the key submit_3rd_party. At the checkbox input itself we use Gravity Forms’s method rgar() to extract values of given key from an array (the form), to make sure we fetch the saved value of our field. Modify the HTML to fit your needs.
The field will now appear at the bottom of form settings. But it won’t save your changes yet, so we need to fix that:
add_filter('gform_pre_form_settings_save', function($form) {
	$form['submit_3rd_party'] = rgpost('submit_3rd_party');
	return $form;
}, 10, 2);
This piece of code uses another one of Gravity Forms’s helper methods, rgpost(), to extract submitted values (from $_POST) and saves them onto the provided form array with our desired key. If you add more settings, you will need to repeat this for each setting.
And that’s all we need for adding custom form settings! Whenever you have access to the form object, you can check the value of $form['submit_3rd_party'].
Send submitted values to third party
A good hook to use for custom actions such as performing a request and send data from a submitted form is gform_after_submission. At this point all validation has passed and the entry (reply) object has been created. With this hook we get access to the entry object and the form object.
What you do in this action is up to you and how you need to extract the data and how you perform the post request. As for this example I’m doing a simple post request using WordPress’ function wp_remote_post() with an array of all fields that had filled in our custom input in body.
You’ll see that I first check if the form has activated submissions. If it has the code loops through all the form fields and checks if each field has added something in our custom input. If the input is indeed not empty, the code also checks if anything was submitted for this field. You can remove this if-check if you are okay to submit empty values.
add_action('gform_after_submission', function($entry, $form) {
	if ($form['submit_3rd_party']) {
		$fields_to_send = [];
		foreach ($form['fields'] as $field_key => $field) {

			if (isset($field->thirdPartyInput) && !empty($field->thirdPartyInput)) {

				if (isset($entry[$field->id]) && !empty($entry[$field->id])) {
					$fields_to_send[$field->thirdPartyInput] = $entry[$field->id];
				}
			}
		}

		// Don't send request if there are no fields to send
		if (empty($fields_to_send)) {
			return;
		}

		$url = 'http://url.to.3rd.party.com/';
		$response = wp_remote_post($url, ['body' => $fields_to_send]);
	}
}, 10, 2);
The part about the URL and how the data will be sent is something you will obviously need to adjust yourself. You can also optionally do something with the response, for instance sending an email if it failed or something. It’s all up to you how you want to handle your functionality.