
This post will guide you in how to create any kind of content (users, posts, or something else custom) based on entries in a Gravity Forms form. We will add an area in entry details screen in admin to create content based on the submitted information.
What we’ll make
We will create a new metabox in Gravity Form’s entry details screen. In this metabox we’ll add a button. The idea is that the end-user can review the entry and if they approve the entry details, they can press the button to trigger the content-creation.
Our code will be triggered upon clicking this button, perform the necessary action, and we will optionally present a message of the result to the end-user. We will also (optionally) add meta data to the entry so we can easily check if content has been created from this entry before or not.
I will keep the code fairly simple and general so that you can easily substitute and tweak it to fit your project’s needs. In the example below I will assume we want to programatically create an user. But what you do with the entry details is entirely up to you; you could create a post, update some other content, or send a custom email if you’d like.
Identifying the fields
The first consideration we have to make is how to identify the fields. In other words, we need to know which field is what. Keep in mind that an entry’s values in Gravity Forms are referred to their form field IDs. And even with access to each form field information – we need a surefire way to know which fields are what information. A form might consist of four text inputs – we need to know which of the four text inputs are for the first name.
You have some alternatives here. You can hardcode the field IDs (e.g. determine that field ID 2 is last name), but this is very prone to error and not recommended. A simple way is using one of the existing field information inputs in Gravity Forms, for example CSS class name. But keep in mind that the end-user can provide multiple class names in order to get the styling they want, and your code can easily break if you are not properly parsing this string. The way I definitely recommend is adding your own custom inputs to fields:
If you want a solid method to identify fields for your code, definitely check out how in the post above. But to keep it simple in this post, I’ll use the CSS class and assume the user don’t enter anything other than the values we need in this area.
Setting up the form
The first step is naturally setting up the form with the fields and field types you need. And then you insert the field identificators at their correct places. As an example I have this form:

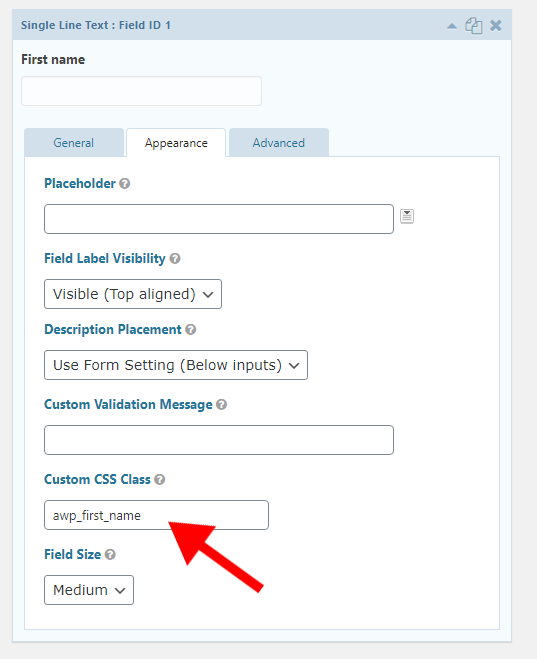
And for each field I want to include, I provide a custom CSS class that I can target in my code. For example for first name;
Now let’s move on to code and how to create a functionality that converts submissions into custom content.
Adding a metabox in entry details
The first step is adding some kind of action trigger to create our custom content. A natural place is in the entry details screen. This allows the end-user to review the submitted values, and then decide whether or not to create content out of it. Gravity Forms allows developers to easily create custom metaboxes in these screens.
To create a custom metabox to entry details we can use the filter gform_entry_detail_meta_boxes. It’s a filter that returns an array of all metaboxes to show in entry details. We simply add a new array element in order to create a new metabox, and define a callback function to render its content. We set a nice descriptive title in ‘title‘ and define its position as to show up in the ‘side‘.
add_filter('gform_entry_detail_meta_boxes', function($meta_boxes, $entry, $form) {
	$meta_boxes['awp-create-user-metabox'] = [
		'title' => __('Create user from entry', 'awp'),
		'callback' => 'awp_gf_create_user_metabox_render',
		'context' => 'side'
	];
	return $meta_boxes;
}, 10, 3);
And then we need to define the callback function: awp_gf_create_user_metabox_render() in our code. This function is responsible for rendering the content of the metabox. As parameter to this function we get an array of arguments, in which we can fetch the form and entry object;
function awp_gf_create_user_metabox_render($args) {
	$form = $args['form'];  // Form array. Here we find all the fields in $form['fields']
	$entry = $args['entry'];  // Entry array. Here we find all values in this current submission

	$render = '';
	echo $render;
}
All we need to do in this function is to build up some HTML and echo it.
As for adding a button to trigger an action we will follow the same method as Gravity Forms itself does it. There is a form element wrapping the entire entry details screen, and all we need to do is adding a onclick event on a submit button that will change the ‘action‘ property. We define our own custom action name, so that we know when it has been triggered – and it doesn’t conflict with Gravity Forms’ actions.
Let’s call our custom action ‘awp_gf_create_user‘ and render a submit button with an onclick event like so:
function awp_gf_create_user_metabox_render($args) {
	$form = $args['form'];  // Form array. Here we find all the fields in $form['fields']
	$entry = $args['entry'];  // Entry array. Here we find all values in this current submission

	$render = '';
	$action = 'awp_gf_create_user';
	$render .= sprintf('<input type="submit" value="%s" class="button" onclick="jQuery(\'#action\').val(\'%s\');" />',
		__('Create user', 'awp'),
		$action
	);
	echo $render;
}
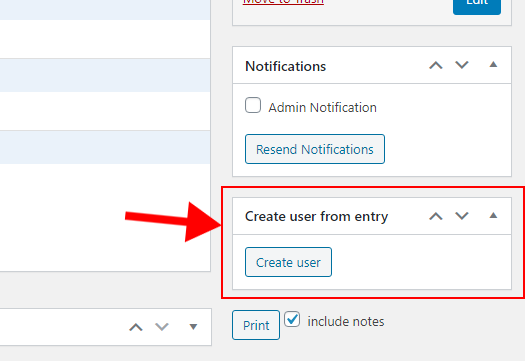
With the above code we will get a new metabox on the side in entry details screen, looking like this:
Right now nothing happens when clicking on the button. That’s just because we haven’t written any code to listen to it yet.
Extracting values from the entry
As mentioned earlier, all submitted values in the entry array is identified by their field IDs.

In the image above the field ID 1 is for first name, ID 2 is last name and so on. But hold on – what’s happening with 5.1, 5.3 and so on? In Gravity Forms we get “sub-IDs” for special field that accepts multiple values. I added an address field to my form which is one field, but multiple inputs. Each input within this field gets their own IDs, appended to the main ID and a period. If you don’t use any of these multiple-inputs fields, great! The code gets really simple. But I have included this special field so we can see how to access it.
Right now our problem is that the code doesn’t know what field ID 1, 2, or 3 are for. That information lies in the form array, more specifically the $form['fields'] element. This element contains all fields in the form, and we have full access to each field object. It’s here we can find our chosen identification method; in my example cssClass.
We can simply loop through these fields and look for the identificators we want to extract. I’ll put all my identificators in an array and we can simply check if a field in the loop is one of these.
But first we need to know that the button was clicked. This is pretty simple; we can simply check if our custom action resides in the $_POST array. But because we are working with Gravity Forms we can use rgpost(). The Gravity Forms function rgpost() simply returns the value of a POST request. Checking rgpost('awp_gf_create_user') and $_POST['awp_gf_create_user'] is exactly the same. But we’ll use Gravity Forms’s function.
	...
	$render = '';
	$action = 'awp_gf_create_user';

	if (rgpost('action') == $action) {  // Button was clicked
		$values = [];
		// All identificators
		$css_classes = ['awp_first_name', 'awp_last_name', 'awp_email', 'awp_address'];

		foreach ($form['fields'] as $field) {
			if (in_array($field->cssClass, $css_classes)) {
				$values[$field->cssClass] = $entry[$field->id];
			}
		}
	}
	$render .= sprintf('<input type="submit" value="%s" class="button" onclick="jQuery(\'#action\').val(\'%s\');" />',
	...
At line #8 we define an array with all custom identificators we wish to search for. These are all the values that I have entered as CSS class in my form. Then, in the loop for each field, we check if the field is one of these identificators. In my example I’m using the CSS class to identify fields but I recommend using custom inputs. This code will also not work if multiple CSS classes were given.
Then at line #12 we add a new element to our final values array with the identificator as a key. We then use the field’s ID and reference the entry array. At the end of this loop $values should be filled with any submitted values that are relevant. Any fields that were left empty, or not included in the identificator array will be excluded.
If you added a special multiple input-field you will need to add some extra code to properly reference the sub IDs. I know that awp_address is an Address field type. Address field types in Gravity Forms follow a fixed pattern of sub IDs, and I have only enabled three of possible inputs (Street address 1 has sub ID 1, Post code has sub ID 3, and City has sub ID 5). To handle these kind of fields, we need to do something like this:
		...
		foreach ($form['fields'] as $field) {
			if (in_array($field->cssClass, $css_classes)) {
				if ($field->cssClass == 'awp_address') {
					$address = $entry[$field->id.'.1'] . ', ' . $entry[$field->id.'.5'] . ' ' . $entry[$field->id.'.3'];
					$values[$field->cssClass] = $address;
				} else {
					$values[$field->cssClass] = $entry[$field->id];
				}
			}
		}
		...
At line #4 I concatenate all values so that the final string is a standardized one-line address format (“<Street address>, <Zip> <City>”).
We now have all necessary values nicely sorted by identificator keys in the array $values. What you do with this is entirely up to you and your project’s needs. But I will include an example of creating an user in WordPress.
Creating a new user from entry submission
To keep my code clean I will call a separate function that is responsible for creating a new user. All I need is to pass the values array. I want this function to return some kind of indication of the result of this action. This way I can create a message whether or not the user was successfully created or if an user with the provided email already exists.
		...
		foreach ($form['fields'] as $field) {
			if (in_array($field->cssClass, $css_classes)) {
				$address = $entry[$field->id.'.1'] . ', ' . $entry[$field->id.'.5'] . ' ' . $entry[$field->id.'.3'];
					$values[$field->cssClass] = $address;
				} else {
					$values[$field->cssClass] = $entry[$field->id];
				}
			}
		}
		$result = awp_gf_create_user($values);
	}
	...
Then we simply define the awp_gf_create_user() function. I will include a simple example of creating an user programmatically in WordPress. This is simply meant as an example to show how to use the extracted values.
First we check if an user with the given email exists with get_user_by(). If not we use wp_insert_user() to add an user. I’ve also included an example of storing custom user meta (our address field). Finally our method should return the result of creating the user. If the user already existed, we return -1. Otherwise we return the user ID.
function awp_gf_create_user($values) {
	// Check if user exists
	$exists = get_user_by('email', $values['awp_email']);
	if ($exists) {
		return -1;
	}

	// Create user
	$random_password = wp_generate_password(12, false);
	$user_id = wp_insert_user([
		'user_email' => $values['awp_email'],
		'user_login' => $values['awp_email'],
		'user_pass' => $random_password,
		'first_name' => $values['awp_first_name'],
		'last_name' => $values['awp_last_name'],
		'role' => 'author'
	]);

	// Optional: custom user meta
	if ($user_id) {
		update_user_meta($user_id, 'address', $values['awp_address']);
	}

	// Return user ID (or WP_Error) back to metabox render function so we can display an appropriate message
	return $user_id;
}
Back in our metabox render we can now conditionally add a message to the end-user based on the result of this. This is a simple example; if the returned value was -1 an user with the provided email already exists. And if the returned value was greater than 0 we know it successfully created an user. Thus we prompt a message saying the user creation was successful.
	...
	$message = '';
	if (rgpost('action') == $action) {  // Button was clicked
		...
		$result = awp_gf_create_user($values);
		if ($result > 0) {
			$message = __('User successfully created!', 'awp');
		} else if ($result == -1) {
			$message = __('An user by that email already exists!', 'awp');
		}
	}

	if (!empty($message)) {
		$render .= '<p>' . $message . '</p>';
	}
	$render .= sprintf('<input type="submit" value="%s" class="button" onclick="jQuery(\'#action\').val(\'%s\');" />',
	...
Avoiding duplicate content
The simple example above will inheritly disable creating multiple users from the same entry because it checks whether or not an user with provided email address already exists. But in other cases you might not have this opportunity. So another strategy to avoid end-users creating duplicate content from the same entry is adding custom entry meta. In other words; if the action was successful we add a custom meta to that entry. And then we simply check if that custom meta exists before we start the action.
Gravity Forms offers methods for adding custom meta to entries; gform_add_meta() as well as fetching values: gform_get_meta().
	...
	$message = '';
	if (rgpost('action') == $action) {  // Button was clicked
		$already_created = gform_get_meta($entry['id'], 'awp_created_user');
		if ($already_created) {
			$message = __('You have already created an user from this entry!', 'awp');
		} else {
			...
			$result = awp_gf_create_user($values);
			if ($result > 0) {
				gform_add_meta($entry['id'], 'awp_created_user', $user_id, $form['id']);
				$message = __('User successfully created!', 'awp');
			} else if ($result == -1) {
				$message = __('An user by that email already exists!', 'awp');
			}
		}
	}
	...
At line #4 we fetch our custom entry meta. If it existed (not empty), we set a message informing the end-user that he or she already has tried to create content from this entry before. If the custom meta didn’t exist we then continue on creating our content. When the content was successfully created we need to add the custom meta to the entry (line #10).
Conclusion and final code
In this post I have tried to give an example of how to create content from an entry in Gravity Forms. The code examples are meant to give you an idea in how to customize and change it to fit your project’s needs. I definitely recommend expanding this functionality to handle error messages better. You might also want to only add this metabox for a specific form(s). But this should be a good base to build upon.
And here’s the final code:
add_filter('gform_entry_detail_meta_boxes', function($meta_boxes, $entry, $form) {
	$meta_boxes['awp-create-user-metabox'] = [
		'title' => __('Create user from entry', 'awp'),
		'callback' => 'awp_gf_create_user_metabox_render',
		'context' => 'side'
	];
	return $meta_boxes;
}, 10, 3);

function awp_gf_create_user_metabox_render($args) {
	$form = $args['form'];  // Form array. Here we find all the fields in $form['fields']
	$entry = $args['entry'];  // Entry array. Here we find all values in this current submission

	$render = '';
	$action = 'awp_gf_create_user';

	$message = '';
	if (rgpost('action') == $action) {  // Button was clicked
		$already_created = gform_get_meta($entry['id'], 'awp_created_user');
		if ($already_created) {
			$message = __('You have already created an user from this entry!', 'awp');
		} else {
			$values = [];
			// All identificators
			$css_classes = ['awp_first_name', 'awp_last_name', 'awp_email', 'awp_address'];
			foreach ($form['fields'] as $field) {
				if (in_array($field->cssClass, $css_classes)) {
					if ($field->cssClass == 'awp_address') {
						$address = $entry[$field->id.'.1'] . ', ' . $entry[$field->id.'.5'] . ' ' . $entry[$field->id.'.3'];
						$values[$field->cssClass] = $address;
					} else {
						$values[$field->cssClass] = $entry[$field->id];
					}
				}
			}

			$result = awp_gf_create_user($values);

			if ($result > 0) {
				gform_add_meta($entry['id'], 'awp_created_user', $user_id, $form['id']);
				$message = __('User successfully created!', 'awp');
			} else if ($result == -1) {
				$message = __('An user by that email already exists!', 'awp');
			}
		}
	}

	if (!empty($message)) {
		$render .= '<p>' . $message . '</p>';
	}
	$render .= sprintf('<input type="submit" value="%s" class="button" onclick="jQuery(\'#action\').val(\'%s\');" />',
		__('Create user', 'awp'),
		$action
	);
	echo $render;
}

function awp_gf_create_user($values) {
	// Check if user exists
	$exists = get_user_by('email', $values['awp_email']);
	if ($exists) {
		return -1;
	}

	// Create user
	$random_password = wp_generate_password(12, false);
	$user_id = wp_insert_user([
		'user_email' => $values['awp_email'],
		'user_login' => $values['awp_email'],
		'user_pass' => $random_password,
		'first_name' => $values['awp_first_name'],
		'last_name' => $values['awp_last_name'],
		'role' => 'author'
	]);

	// Optional: custom user meta
	if ($user_id) {
		update_user_meta($user_id, 'address', $values['awp_address']);
	}

	// Return user ID (or WP_Error) back to metabox render function so we can display an appropriate message
	return $user_id;
}