
In this tutorial I’ll show you how to create a front-end form with Advanced Custom Fields (ACF). I’ll go into detail about how it works and how you can tweak it to fit your needs.
Advanced Custom Fields (ACF) is a free plugin that helps you add field settings of a whole bunch of types to almost any type of content in WordPress. You can add fields to posts, taxonomies, menus, widgets, users, and even custom admin pages. Its main use is for admin, but you can use it to generate the fields in front-end as well.
The applications for adding ACF fields to front-end are many; you can add a form to create and update posts, categories, or users. With some code you can even create a general contact form where answers are saved as custom post type posts and the code triggers email notifications on form replies. Just like a normal contact form. Using ACF front-end form functionality to create forms and to allow visitors to create or edit site content without logging in are the common uses. But use this with caution. This easily opens up for spam and abuse, and in worst case scenario visitors can destroy your site’s content or settings. You should at the very least require visitors to log in with valid users in order to gain access to forms that can alter critical WordPress content (user profile, posts, etc).
What we’ll make
I’m assuming the WordPress site has defined a set of additional fields on users of a custom role (‘member‘) using ACF. These users don’t have admin access at all but we want to offer them the possibility to edit their custom fields on their profile. The solution I’ve opted for is creating a custom page template for updating their profile, only showing the form if they are logged in and of correct role.
I’m keeping it fairly simple in this tutorial so I won’t include an example of adding the standard user profile fields in WordPress (email, password, etc). That falls a bit out of the scope of this tutorial. I will only allow editing the ACF fields on this edit profile page.
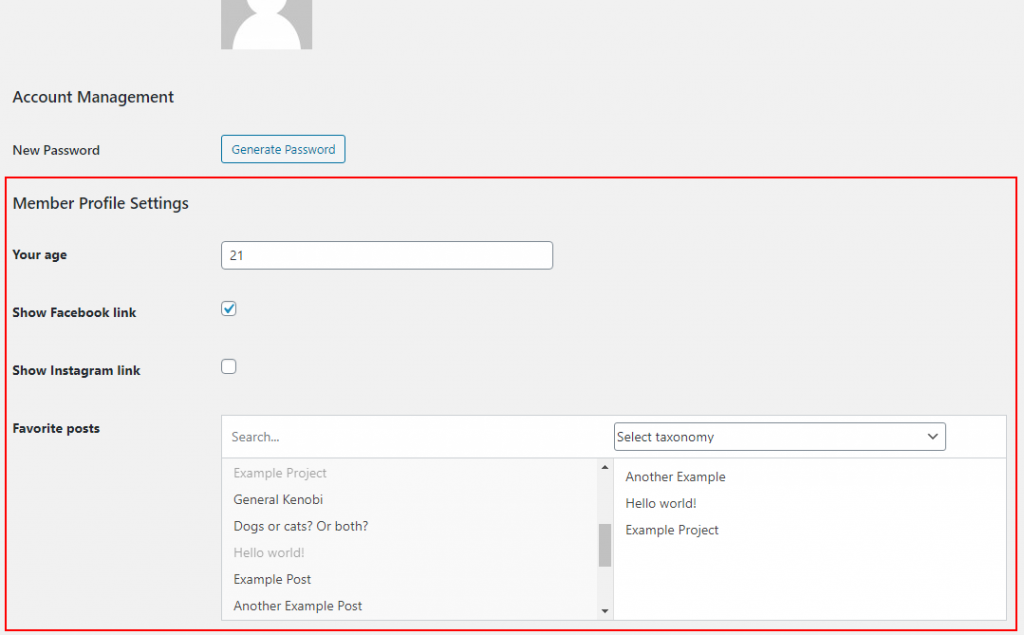
With ACF I’ve created a field group with a set of settings for member users:

And I’ve got a custom page template in my theme that currently looks like this – at the moment just a plain standard single page template;
<?php
/* Template Name: ACF Profile Page */
get_header(); ?>
<main class="content">
	<?php if (have_posts()) {
		while (have_posts()) : the_post(); ?>
		<article id="post-<?php the_ID() ?>" <?php post_class(); ?>>
			<h2 class="page-title"><?php the_title(); ?></h2>
			<?php the_content(''); ?>
			<?php
			if (is_user_logged_in() && current_user_can('member')) {
				// Profile settings here
			}
			?>
		</article>
	<?php endwhile;
	} ?>
</main>
<?php
get_sidebar();
get_footer();
At line #11 we check if the current user is logged in and has the custom role member. Change the role or minimum rule to whatever you want to allow this front-end form for. Just remember that even the lowest role in WordPress, subscriber, has access to editing their profile in admin panel.
So in short, we want to add these fields on each member onto that custom front-end page:
How ACF front-end forms work
You need to add two function calls in the template you want the front-end form; acf_form_head() and acf_form().
The function acf_form_head() must be placed at the very top of your template, before any output. Usually in a template this means before get_header(). The function call makes sure all scripts and styles are added so that the ACF fields will be rendered correctly, as well as all functionality for processing, validating and submitting work. We don’t need to add any parameters to this function.
The acf_form() function is the one rendering the front-end form and should be placed where you want the form to appear. It accepts an array of settings. We need to as minimum inform about which fields or groups to show, and onto where to save them.
When it comes to deciding which fields to show you’d usually provide a field group (property field_groups). But the acf_form() function supports providing specific single fields as well (property fields). You can also provide multiple fields or field groups to combine them into the same form. Because of this field_groups expects an array. So even if you only want to show one field group, you need to provide that ID or slug inside an array.
The second required property you need to provide form acf_form() is where the data should be loaded from and where they should be saved, in the property post_id. Don’t be fooled by the name ‘post’. The rules for post_id are the same when you use get_field(), if you are familiar with working with ACF from before. If the fields are for a post (post, page, custom post type post) you need only provide the ID here. But if you want to load and update data on users, you’d follow this format: user_{user ID}. Similarly with fields for a category: category_{category ID}. Check out all rules under the heading “Get a value from different objects” in ACF’s doumentation on get_field().
Adding ACF front-end form to our template
First we add the acf_form_head() at the very top, right before get_header() – but after the page template declaration (line #3). Then at the place where we want to render the form we add acf_form() with two properties.
We need to find out our field group ID. If you added the field group by code (I have a post goes in depth about how to add ACF fields by code) you have already provided a field group slug. You would then provide the slug to the field_groups property, in an array. If you added the field group in admin panel you need to open up the group in the browser and check the URL. We are interested in the ID that appears after “?post=“:
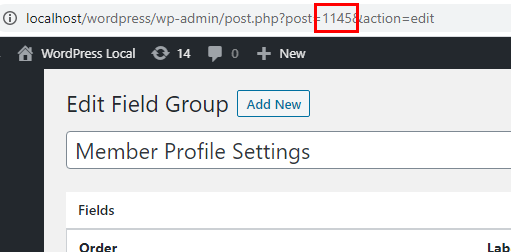
In my example the ID is 1145. Then that’s what I provide in the array of field_groups.
PS: I don’t recommend hardcoding an ID as this ID will be different in each WordPress instance! If you are working on a local installation as well as a staging and production server, I’d definitely recommend adding the fields by code instead. That way you can define a field group name and it will work everywhere.
As for the post_id property I can get the current user ID using the WordPress function get_current_user_id(). I concatenate the string ‘user_‘ and the return of this function as post_id.
<?php
/* Template Name: ACF Profile Page */
acf_form_head();
get_header(); ?>
<main class="content">
	<?php if (have_posts()) {
		while (have_posts()) : the_post(); ?>
		<article id="post-<?php the_ID() ?>" <?php post_class(); ?>>
			<h2 class="page-title"><?php the_title(); ?></h2>
			<?php the_content(''); ?>
			<?php
			if (is_user_logged_in() && current_user_can('member')) {
				$current_user_id = get_current_user_id();
				acf_form([
					'field_groups' => [1145],
					'post_id' => 'user_' . $current_user_id
				]);
			}
			?>
		</article>
	<?php endwhile;
	} ?>
</main>
<?php
get_sidebar();
get_footer();
And that’s basically it!
If I visit this page logged in as a member user I’d get the current values for that user. All ACF field types work and look good. And I can update the values using the front-end form, and see that they are updated in admin as well.
Further customizing the form
We can further tweak the settings passed to acf_form(). Refer to ACF’s documentation on acf_form() to see all possible settings.
At the moment our user profile form displays “Post updated” when settings are submitted. This doesn’t make sense for profile settings. We can customize the message with the property updated_message.
acf_form([
	'field_groups' => [1145],
	'post_id' => 'user_' . $current_user_id,
	'updated_message' => __('User profile updated.', 'txtdomain')
]);
If you want to you can define a different URL to redirect to after the form has been submitted. As default the same page reloads with GET parameter ‘?updated=true‘. You can specify a specific URL to a thank you page, or if the form is for a post you might want to redirect to viewing that post. We can provide the URL in the property return.
acf_form([
	'field_groups' => [1145],
	'post_id' => 'user_' . $current_user_id,
	'return' => home_url('thank-you')
]);
If we want a different text on the form submit button we can specify this in the property submit_value.
acf_form([
	'field_groups' => [1145],
	'post_id' => 'user_' . $current_user_id,
	'submit_value' => __('Update profile', 'txtdomain')
]);
You can also tell acf_form() to not render the <form> tag. If you want to combine ACF’s form with your own custom form you can set form to false and type out the <form> and <input type="submit"/> manually. If you do this ACF will still be able to update the values, but you need to take care of updating any other fields within your custom form.
<form method="POST">
	<input type="text" name="my-custom-input" value="" />
	<?php
	acf_form([
		'field_groups' => [1145],
		'post_id' => 'user_' . $current_user_id,
		'form' => false
	]);
	?>
	<input type="submit" value="<?php _e('Submit', 'txtdomain'); ?>" />
</form>
Triggering actions upon form submissions
Sometimes you might want to trigger some custom function or events when a front-end form is updated. A common example is writing a function that sends an email notification upon each form submission.
Advanced Custom Fields offers two useful hooks for when fields are updated; the action acf/save_post and the filter acf/pre_save_post. Again, don’t be fooled by the name ‘post’. They are triggered for any ACF fields update including fields for an user, category, menu, and so on.
The filter acf/pre_save_post is only run on front-end forms using acf_form(). As parameter to this filter we get post_id, the same value as we passed in post_id in acf_form() above. The filter expects you to return post_id. Remember that we need to parse this if we are not referring to a post ID. For example for user you’d need to do something like:
add_filter('acf/pre_save_post', function($post_id) {
	if (strpos($post_id, 'user_') === false) {
		return $post_id;
	}

	$user_id = intval(substr($post_id, 5));  // Extracts the user ID

	// Do your thing. You'll find the submitted values in $_POST

	return $post_id;
});
Alternatively you can use the hook acf/save_post – but remember that it’s triggered in admin as well. As parameter to this hook you’ll get post_id, same as acf/pre_save_post. An important thing to remember when using acf/save_post is that you can use the hook priority to control if your function is run before fields are saved, or after. A function hooked on priority 10 or higher will be triggered after fields are saved. And a priority of less than 10 will be triggered before ACF saves the values.
add_action('acf/save_post', function($post_id) {
	// You can fetch the values with standard get_field()
});

add_action('acf/save_post', function($post_id) {
	// You can access the submitted values in $_POST
}, 8);
When you’ve hooked the function before save (priority less than 10) you can compare the submitted values with what ACF will save. You can do get_field() to get the current value and compare them to the corresponding value in $_POST.
If you want to do something only when the fields were updated in front-end, you can simply check if we are in admin with is_admin(). Below is an example of how you would go about setting up email notifications when an user is updating their settings in front-end;
add_action('acf/save_post', function($post_id) {
	if (strpos($post_id, 'user_') === false) {
		return $post_id;
	}

	if (is_admin()) {
		return;  // Bail if we are updating in admin
	}

	$user_id = intval(substr($post_id, 5));

	// Use get_field() to get the saved/submitted values if needed
	// Then use wp_mail() to send an email
});