
In this post we’ll look at how to add custom post meta settings to the Gutenberg sidebar, in “Document” tab, rather than relying on adding meta boxes the traditional (and quite honestly much more manual) way.
If you’ve worked with WordPress a while before Gutenberg was a thing, you’re probably familiar with adding custom post meta with add_meta_box(). This function allows you to add a meta box with your custom content either at the bottom or on the side when editing a post. This method still works, also in the Gutenberg editor!

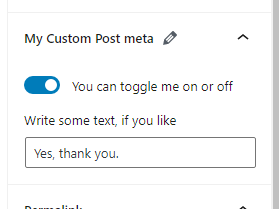
However it looks a little off compared to the rest of the Gutenberg sidebar content. And not to mention, you would need to manually write input code (checkbox, text inputs etc) with PHP and also make write additional code to save them when the post is updated. And if you wanted your post meta settings to be dynamic (say you wanted to hide a field unless some other field was toggled on), then you’d have to manually enqueue a script and yep, you guessed it, manually handle the dynamic logic of hiding and showing. This all is now outdated and made easier with the new Javascript-based Gutenberg-editor. We can pretty easily make something like this:
The process
The process is as follows:
- We register each custom post meta key we want to add in PHP using
register_post_meta(), and set it as available in WP REST API. This is a necessary step to make the post meta available in the Gutenberg editor. - We create a Javascript file and enqueue it specifically to the editor (only).
- Inside the Javascript file we register a plugin with
registerPlugin()telling it to render our component. - Inside that component we can output whatever we need. We can use WordPress’ built-in components to easily render different types of settings. And using WordPress data package we can fetch and update the post meta values right away as they are changed.
Let’s get straight into it, starting with the PHP part; registering the post meta.
Registering post meta
For each post meta you want to add to Gutenberg sidebar, you will need to register using register_post_meta(). This is necessary to make them available through WP REST API (which Gutenberg uses) and thus available in our Javascript.
In your theme’s functions.php file or some other active PHP file, add a function hooked to the ‘init‘ hook. Inside the function you repeat a register_post_meta() for each custom post meta you want to add. The function takes three arguments; first parameter is the post type you want to register the meta for (set as empty string for all post types). Second parameter is the meta key name for your meta. And the third is an array of settings. It’s in here we define that this meta should be accessible in WP REST API by setting ‘show_in_rest‘ to true.
For example’s sake let’s say I want to add a toggle on/off and a text input to the editor sidebar. That means I call register_post_meta() for a boolean and a string value type, respectively. I also want to limit these post meta to post type ‘post’ only. That would look something like:
add_action( 'init', function() {
	register_post_meta( 'post', '_my_custom_bool', [
		'show_in_rest' => true,
		'single' => true,
		'type' => 'boolean',
	] );

	register_post_meta( 'post', '_my_custom_text', [
		'show_in_rest' => true,
		'single' => true,
		'type' => 'string',
	] );
} );
Now I have a post meta key _my_custom_bool and _my_custom_text ready and available in Gutenberg. I recommend that you rename them to something that makes sense to you.
Registering our Javascript plugin
For our next step we’ll add a Javascript file and make sure to enqueue it using PHP.
Keep in mind that I write the Javascript code in ES6 syntax. This means I have set up a webpack/Babel configuration to compile my file into separate readable Javascript file for the browser.
I have a guide on how to set this up if you are unsure on how this works:
We need to make sure that WordPress loads our script in the editor. We do this by hooking a function onto enqueue_block_editor_assets and calling wp_enqueue_script():
add_action( 'enqueue_block_editor_assets', function() {
	wp_enqueue_script(
		'awp-custom-meta-plugin',
		get_template_directory_uri() . '/assets/js/gutenberg/plugin-awp-custom-postmeta.js',
		[ 'wp-edit-post' ],
		false,
		false
	);
} );
I assume you’re familiar with how to enqueue scripts, and are able to replace the values with your own. As second parameter I provide the path to the build file (not the source file). To ensure that our script is not loaded too early, I set ‘wp-edit-post‘ as a dependency. That’s the package we need to handle post meta.
Now let’s move on to the Javascript part.
First we need to call registerPlugin() and pass on our component for rendering the panel in the Gutenberg Document sidebar. This function is available in the wp.plugins package, so I destructure it at the top. I like to keep my files tidy, so I create another file; “awp-custom-postmeta-fields.js” to contain the component rendered and import that.
const { registerPlugin } = wp.plugins;

import AWP_Custom_Plugin from './awp-custom-postmeta-fields';

registerPlugin( 'my-custom-postmeta-plugin', {
	render() {
		return(<AWP_Custom_Plugin />);
	}
} );
Writing our component
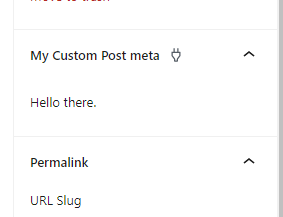
Let’s start creating a basic component that doesn’t do anything else than just sit there in the correct place, so we get that out of the way first. In order to render a component in Gutenberg’s Document sidebar, we use the PluginDocumentSettingPanel component. We can set attributes such as a title, icon and className. And whatever’s inside will be rendered in the Document’s sidebar. For now I’m just outputting some text “Hello there.”
const { __ } = wp.i18n;
const { PluginDocumentSettingPanel } = wp.editPost;
const { PanelRow } = wp.components;

const AWP_Custom_Plugin = () => {
	return(
		<PluginDocumentSettingPanel title={ __( 'My Custom Post meta', 'txtdomain') } initialOpen="true">
			<PanelRow>
				Hello there.
			</PanelRow>
		</PluginDocumentSettingPanel>
	);
}

export default AWP_Custom_Plugin;
With the above code (compiled), we get this:
Awesome. However we want to add some inputs. But in order to connect those inputs with our custom post meta, we need to compose our component with the higher order components withSelect (to fetch the post meta values) and withDispatch (to update the post meta values). It might seem a bit complex if you haven’t worked with higher order components before, but once you wrap your head around it, it’s pretty simple.
We need to first change our export statement. Rather than just returning our component alone, we need to compose it with withSelect and withDispatch, both in the wp.data package.
Inside withSelect() we have access to the powerful select() function. Using select() we can fetch the current post’s meta values. We can also fetch the current post type, if we want to. As I mentioned earlier when registering post meta, we can limit the post metas to a specific post type. If we fetch the current post’s post type, we can in our component make sure to only render our code if we’re at the correct post type. More on that later.
In withDispatch() we can define functions that we can run in our component. We make a function that will use dispatch() to update the post meta.
Let’s change the export statement to this:
export default compose( [
	withSelect( ( select ) => {
		return {
			postMeta: select( 'core/editor' ).getEditedPostAttribute( 'meta' ),
			postType: select( 'core/editor' ).getCurrentPostType(),
		};
	} ),
	withDispatch( ( dispatch ) => {
		return {
			setPostMeta( newMeta ) {
				dispatch( 'core/editor' ).editPost( { meta: newMeta } );
			}
		};
	} )
] )( AWP_Custom_Plugin );
We also need to destructure these from the following packages in the top of the file:
const { compose } = wp.compose;
const { withSelect, withDispatch } = wp.data;
With this our AWP_Custom_Plugin component has access to three new props; postMeta which contains all post meta values to the current post; postType which contains the current post’s post type; and finally the function setPostMeta() we made in withDispatch() which will update the post’s meta.
So in our component definition we can destructure those three new props;
const AWP_Custom_Plugin = ( { postType, postMeta, setPostMeta } ) => {
...
And now we can add some inputs to our render, making sure that they display the current value, and that they update the post meta in the on change event. I registered a boolean and a string, so as an example I’ll add a ToggleControl for a toggle and a simple TextControl for a text input.
If you are unsure about the built-in components in WordPress, I have a completely free e-book that covers pretty much most of the components available in Gutenberg- including what props we can set for each.
Here’s an example of how our component could look like:
const { ToggleControl, TextControl, PanelRow } = wp.components;

const AWP_Custom_Plugin = ( { postType, postMeta, setPostMeta } ) => {
	return(
		<PluginDocumentSettingPanel title={ __( 'My Custom Post meta', 'txtdomain') } icon="edit" initialOpen="true">
			<PanelRow>
				<ToggleControl
					label={ __( 'You can toggle me on or off', 'txtdomain' ) }
					onChange={ ( value ) => setPostMeta( { _my_custom_bool: value } ) }
					checked={ postMeta._my_custom_bool }
				/>
			</PanelRow>
			<PanelRow>
				<TextControl
					label={ __( 'Write some text, if you like', 'txtdomain' ) }
					value={ postMeta._my_custom_text }
					onChange={ ( value ) => setPostMeta( { _my_custom_text: value } ) }
				/>
			</PanelRow>
		</PluginDocumentSettingPanel>
	);
}
At line #9-10 and #16-17 we find the critical parts. We set the inputs’s current value to postMeta.<your meta key here> and in their onChange event we run the function setPostMeta( { <your meta key here>: ... } ) to the new updated value.
Finally a word on how to limit your component to a specific post type. In our withSelect() we are passing the current post’s post type in the prop postType. All we need to do in our component is to compare this value to a post type, and return null if it doesn’t match:
const AWP_Custom_Plugin = ( { postType, postMeta, setPostMeta } ) => {
	if ( 'post' !== postType ) return null;  // Will only render component for post type 'post'


	return(
	...
And that’s it! Our code should now be working. The final result should be something like:
Final code
Registering post meta and enqueuing the Javascript file:
functions.php
add_action( 'init', function() {
	register_post_meta( 'post', '_my_custom_bool', [
		'show_in_rest' => true,
		'single' => true,
		'type' => 'boolean',
	] );

	register_post_meta( 'post', '_my_custom_text', [
		'show_in_rest' => true,
		'single' => true,
		'type' => 'string',
	] );
} );

add_action( 'enqueue_block_editor_assets', function() {
	wp_enqueue_script(
		'awp-custom-meta-plugin',
		get_template_directory_uri() . '/assets/js/gutenberg/plugin-awp-custom-postmeta.js',
		[ 'wp-edit-post' ],
		false,
		false
	);
} );
The two Javascript files:
awp-custom-postmeta-register.js
const { registerPlugin } = wp.plugins;

import AWP_Custom_Plugin from './awp-custom-postmeta-fields';

registerPlugin( 'my-custom-postmeta-plugin', {
	render() {
		return(<AWP_Custom_Plugin />);
	}
} );
awp-custom-postmeta-fields.js
const { __ } = wp.i18n;
const { compose } = wp.compose;
const { withSelect, withDispatch } = wp.data;

const { PluginDocumentSettingPanel } = wp.editPost;
const { ToggleControl, TextControl, PanelRow } = wp.components;

const AWP_Custom_Plugin = ( { postType, postMeta, setPostMeta } ) => {
	if ( 'post' !== postType ) return null;  // Will only render component for post type 'post'

	return(
		<PluginDocumentSettingPanel title={ __( 'My Custom Post meta', 'txtdomain') } icon="edit" initialOpen="true">
			<PanelRow>
				<ToggleControl
					label={ __( 'You can toggle me on or off', 'txtdomain' ) }
					onChange={ ( value ) => setPostMeta( { _my_custom_bool: value } ) }
					checked={ postMeta._my_custom_bool }
				/>
			</PanelRow>
			<PanelRow>
				<TextControl
					label={ __( 'Write some text, if you like', 'txtdomain' ) }
					value={ postMeta._my_custom_text }
					onChange={ ( value ) => setPostMeta( { _my_custom_text: value } ) }
				/>
			</PanelRow>
		</PluginDocumentSettingPanel>
	);
}

export default compose( [
	withSelect( ( select ) => {
		return {
			postMeta: select( 'core/editor' ).getEditedPostAttribute( 'meta' ),
			postType: select( 'core/editor' ).getCurrentPostType(),
		};
	} ),
	withDispatch( ( dispatch ) => {
		return {
			setPostMeta( newMeta ) {
				dispatch( 'core/editor' ).editPost( { meta: newMeta } );
			}
		};
	} )
] )( AWP_Custom_Plugin );