
Building simple or complex forms in Gravity Forms is easy and quick. One of the functionality Gravity Forms offers is allowing you to conditonally pre-select or pre-fill in fields in a form. This is useful when you have the same form on multiple contact pages for each department, and want to preselect the corresponding department in the form. Or you are embedding a request form on products or services pages, and want to automatically prefill information about the current product or service in every submission.
You can dynamically pre-select or pre-fill in fields in several ways, and you can also dynamically replace the possible choices in a dropdown, radio button or checkbox group. The field you dynamically populate can be a visible field the user can edit, or it can be routed into a hidden field so that the reader of the form submissions gets vital information.
The four ways to dynamically populate fields
In this guide we’ll look at four ways of dynamically populating fields in a Gravity Forms form. Three of them you can do without touching any code! But if you want to dynamically modify the possible choices in a select, radio button group or checkboxes you’ll need to write some PHP code. We’ll look at how to do that at the very end.
You can dynamically populate fields by:
- Adding extra information in the URL.
- Provide extra information to the Gravity Forms embed shortcode.
- Defining extra information to the Gravity Forms Block (if you are using WordPress with Gutenberg).
- Using filters with PHP code.
But first we need to go through how to activate dynamic population of a field.
Activating a field to allow dynamic population
The first step regardless of which method you use to populate the field, is to activate this on the field itself.
In form edit, expand the field and inside the tab “Advanced”, you’ll find a checkbox “Allow field to be populated dynamically”. Check this off and a new text input appears allowing you to define your parameter name. This can be anything you want, but should be unique and without spaces.
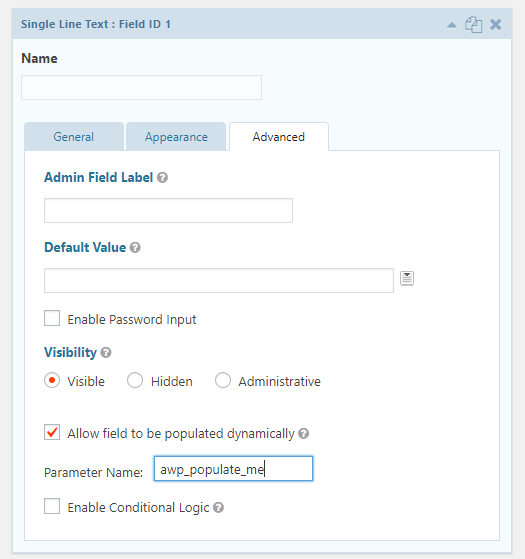
Save the form and it’s ready for you to decide which method you want to use to populate it.
Dynamically populating from URL parameters
You can append GET parameters to the link to the page that embeds the form, for example if the link is inside another post text or is a custom link in WordPress Menus.
Simply add query variables in key value pairs, with parameter name as key and their value as whatever you wish their value should be. It is possible to add multiple key value pairs if you want to populate multiple fields in the form, simply separate each pair with “&”.
Assuming your form exists on this page: “https://example.com/contact-me/“, and your parameter name is awp_populate_me you can populate the field by using this URL: “https://example.com/contact-me/?awp_populate_me=Hello“.
Keep in mind that URLs must be properly encoded. For example you can’t simply add spaces or special characters directly as the parameter value. Providing “Hello world!” as value would be “Hello%20world%21“. There are plenty of online tools for encoding URLs for you if you wish to go this way.
Dynamically populating from shortcode
All forms are inserted via a shortcode. You can dynamically populate fields directly inside this shortcode. This method could be useful if you are using the same form in multiple posts (e.g. registering attendees for several different events or courses), and you need to provide something unique as to know which event or course the form came from……
Normally when you embed a form, it results in a shortcode that looks something like this: [gravityforms id="1" title="Contact us"]
Edit the shortcode and add the key set field_values to a string that contains your parameter name equals desired value. For example setting a parameter awp_populate_me to ‘Hello World’ is done like this:
[gravityforms id="1" title="Contact us" field_values="awp_populate_me=Hello World"]
If you need to populate multiple fields add a “&” inbetween, like so:
[gravityforms id="1" title="Contact us" field_values="awp_populate_me=Hello World&awp_another_field=Hello to you too"]
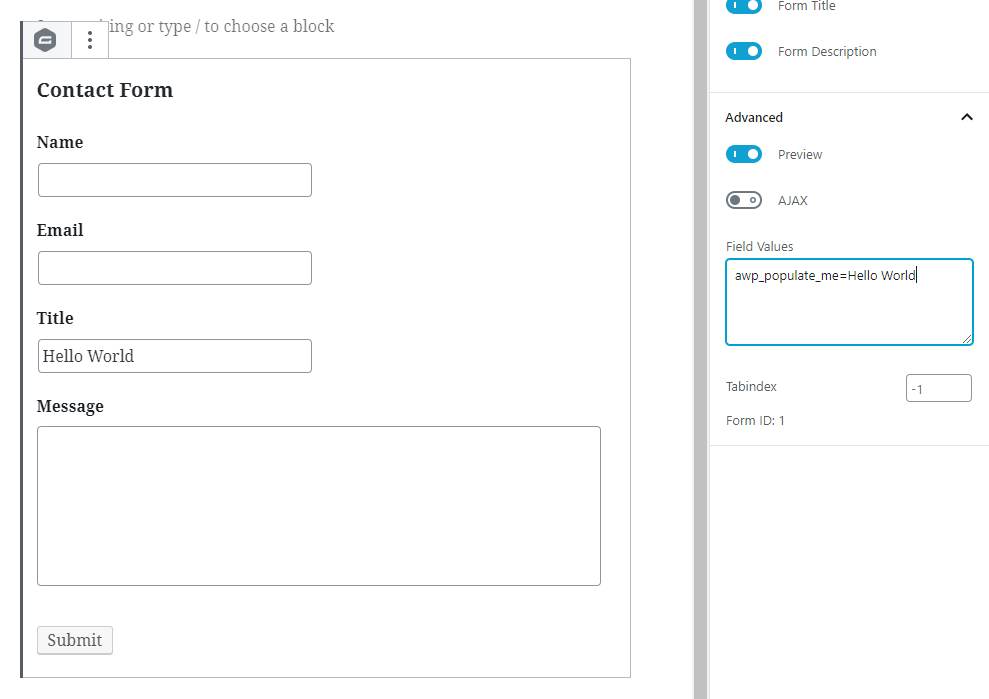
Dynamically populating from Block in Gutenberg
If you have GravityForms version 2.4.13+ and WordPress with Gutenberg (WordPress 5+), you can add Gravity Forms as a Block. Within this block you have a method for populating fields as well.
Add the block “Forms” into Gutenberg and choose your form. The block should change into a form preview. In the right side panel expand Advanced, and you’ll find a textarea labeled “Field values”. In this textarea you can type in your parameter names and values, just like you would type in the shortcode. E.g. “awp_populate_me=Hello World!“
Dynamically populating from code
And finally, if you’d rather populate your fields using PHP code, there are filters for this. You can place this code in your theme’s functions.php.
How you code this depends on what type of field it is; as you can probably guess populating (replacing all choices) in a select, checkboxes or radio group must be handled differently than just populating a single textfield.
Populating a single value field
Populating a field that has a single value (this applies to text field, textarea, email field, phone field and similar) is easily done by filtering gform_field_value_<parameter name>. In our example:
add_filter('gform_field_value_awp_populate_me', function($value) {
	return 'Hello world!';
});
You can also use this filter to pre-select an option in a multivalue field, e.g. select (dropdown), radio buttons, or checkboxes.
Populating a select or radio buttons
If you simply are interested in pre-selecting an option, please follow the above guide for populating a single value field. This code is meant for customizing or replacing the possible choices you get in the field.
Gravity Forms’s form render filters
The gform_pre_render filter allows us to modify the form right before it’s displayed. But when making changes here we should make sure our changes are applied in all cases; so we need to also hook onto gform_admin_pre_render (corresponding pre_render filter but affects admin/form edit), gform_pre_validation (responsible for validating the form before submission), and gform_pre_submission_filter (filter after validation but before entry is saved). Don’t worry, we use one and the same function for all these filters.
You can filter these directly, or you can provide an underscore and the form ID after the filter name, for filtering a specific form only. E.g. gform_pre_render_1 would only be run on a form with the form ID of 1.
As argument to all these filters you get the form object, in which you can get ahold of form ID (alternative method to adding form ID at the filter), and all its fields. The form fields is an array of Field objects – but all we need to worry about is replacing the correct field’s choices property.
Changing the choices
What kind of data you want to replace choices with is entirely up to you, but a field’s choices property needs an array that has the elements ‘text’ and ‘value’. For instance ['text' => 'Hello World!', 'value' => '1', 'text' => 'Second choice', 'value' => '2'].
add_filter('gform_pre_render_1', 'awp_populate_choices');
add_filter('gform_pre_validation_1', 'awp_populate_choices');
add_filter('gform_pre_submission_filter_1', 'awp_populate_choices');
add_filter('gform_admin_pre_render_1', 'awp_populate_choices');
function awp_populate_choices($form) {
	foreach ($form['fields'] as &$field) {
		if ($field->inputName == 'awp_populate_me') {

			// Generate your data here. Below is just an example
			$pages = get_posts('numberposts=-1&post_status=publish&post_type=page');

			// Generate a nice array that Gravity Forms can understand
			$choices = [];
			foreach ($pages as $page) {
				$choices[] = ['text' => $page->post_title, 'value' => $page->ID];
			}

			// Set choices to field
			$field->choices = $choices;
		}
	}
	return $form;
}
The above code filters only the form ID of 1. It starts by looping through the form’s fields. It’s important to note the “&” before the element in the loop, which is passing it by reference. This means that if we make changes to $field, it is applied and saved directly onto the $form['fields'].
The second step is targeting the field that has the parameter name we want to target. For each field this is the inputName property. You can use other ways of targeting fields, e.g. its ID (id) or CSS class (cssClass). When we’ve found our field, we need to generate the replacement array to choices, and set $field->choices to this. In the example above I query all pages, and loop through them to generate a correct formatted array.
Don’t forget to return the $form at the very end, as this is a filter.
It’s worth mentioning that this filter also applies to edit form (because we filter gform_admin_pre_render). But remember that you no longer can manipulate the choices in form edit – it just won’t save your changes because this code will always override it.
Populating checkboxes
I’ll mention it again; if you simply are interested in pre-selecting a checkbox, please follow the above guide for populating a single value field. As for replacing all choices in checkboxes the process is very similar to populating a select or radio buttons above, but with some minor differences. I recommend looking over the explanation above for select and radio buttons first.
You use the same filters and the starting process is the same; you loop through the form’s fields, and find the one you want. However with checkboxes you need to replace two properties in the field object; choices and inputs. The choices property expects the same array as in a select or radio buttons.
The input property expects an array with elements ‘label‘ and ‘id‘. The label is self-explanatory and should be identical to text in choices array. The id element needs to follow Gravity Forms ID rules; concatenating field ID, a dot, and the choice ID, starting with 1 (e.g. if field ID is 2 and choice ID is 3, the correct id is “2.3“).
add_filter('gform_pre_render_1', 'awp_populate_choices');
add_filter('gform_pre_validation_1', 'awp_populate_choices');
add_filter('gform_pre_submission_filter_1', 'awp_populate_choices');
add_filter('gform_admin_pre_render_1', 'awp_populate_choices');
function awp_populate_choices($form) {
	foreach ($form['fields'] as &$field) {
		if ($field->inputName == 'awp_populate_me') {

			// Generate your data here. Below is just an example
			$pages = get_posts('numberposts=-1&post_status=publish&post_type=page');

			// Generate nice arrays that Gravity Forms can understand
			$choices = [];
			$inputs = [];
			$input_id = 1;
			foreach ($pages as $page) {
				$choices[] = ['text' => $page->post_title, 'value' => $page->ID];
				$inputs[] = ['label' => $page->post_title, 'id' => $field->id . '.' . $input_id];
				$input_id++;
			}

			// Set choices to field
			$field->choices = $choices;
			$field->inputs = $inputs;
		}
	}
	return $form;
}
Since choice ID’s need to start at 1, we start a counter variable before the loop and adds 1 for each element in the loop, and use that together with field ID and a dot as id in inputs array.
When we have our two arrays we set them onto the field’s choices and inputs properties, and return the modified form.