
This tutorial will show you how to add theme settings, e.g. theme colors, in WordPress Customizer and recompile the theme stylesheet with the chosen variables. By having theme styling in SCSS using a library you can easily allow theme users to customize any variables in the theme stylesheet, without them having to edit the SCSS files themselves.
Any good theme should allow a good deal of customization. At the very least it should be possible to set the main theme colors. Instead of writing a lot of ugly CSS to override the theme colors everywhere, you can instead recompile the full stylesheet directly from Customizer. This tutorial will teach you how!
What we will make – and what we need
I assume your theme already have a bit of styling going on in SCSS files which you already compile into the theme’s main style.css. And using SCSS you most likely define recurring things such as colors, sizes or breakpoints as SCSS variables, and use those variables throughout your styling.
You can create any and however many Customizer settings you want for the variables in your SCSS file. Colorpickers, number and text inputs are perfect for this. While the user changes the settings in WordPress Customizer, they will see a preview of the theme with the changed variables. And when they click “Save”, the final CSS will be compiled to the main stylesheet CSS file using the chosen values.
As an example for this tutorial I’ll assume the theme’s main stylesheet SCSS file does an @import of a variables.scss file. In there we have defined three variables that we want to be customizable in Customizer: Two colors and one text size in px.
variables.scss
$main: #594c74 !default;
$secondary: #555 !default;
$text-size: 12px !default;
Please note that in order to allow SCSS to redefine variables, they must be defined with !default. This is a rule in SCSS. In order for this tutorial to work; any variables you wish to be customizable must be defined as default in your SCSS files.
It’s up to you when (or if) you want to overwrite the CSS file. This tutorial assumes that when the user clicks “Save” in Customizer, it will recompile and write to the theme’s CSS. However while Customizer preview is active and the user is changing settings (before clicking Save), we simply output the compiled CSS in the header for the website preview. We don’t want to overwrite the CSS file right away in case the user wants to cancel any changes they made.
Keep in mind…
This tutorial will overwrite the theme’s style.css file any time Customizer settings are saved.
I assume you already compile your SCSS files with a compiler program (e.g. Koala or command line). Having this code in your theme will overwrite the CSS file, but it will not change your source SCSS files. This means whenever you make changes in Customizer, and then go back to your original SCSS files and recompile, your Customize settings will be lost!
There are several methods to go around this and it depends on your project and how you work. In most cases it wouldn’t be a problem. It’s usually just a thing to keep in mind while you are developing your theme. If you are giving your finalized theme to someone else to use, they wouldn’t normally touch your SCSS files anyway.
With that out of the way, let’s start look into how we go about doing this:
- Getting familiar with the SCSSPHP library and include it in our theme
- Create Customizer settings for each SCSS variable we want to be customizable
- Making sure the Customizer previews the changes on the go
- When saving Customizer settings we recompile and overwrite the theme’s CSS file.
1. The SCSSPHP library
For compiling the SCSS files we will use a SCSSPHP Library by leafo (MIT license). Please note that this tutorial is for the SCSS library. The library author does have a similar LESS PHP library if you rather want to use LESS, but remember that the following tutorial is for the SCSS library.
The SCSSPHP library is really simple to use! Here’s a simplified overview of how we will use the library in our theme’s PHP:
- We include the library
- Create a new instance of the compiler class from the library
- Load the contents of the source SCSS file and pass it to the compiler object
- Define an associative array; SCSS variable names (including the
$) as keys and their values. Any element in this array will override variables of the same name in the provided SCSS file. - We ask the compiler object to compile and receive the compiled CSS as a string in return. We can then either output this CSS inside
heador we can write this onto the theme’sstyle.cssfile
What kind of SCSS variables can we compile?
The simple answer is: Any kind of valid SCSS variable!
The SCSSPHP library can compile any kind of valid SCSS variable, but keep in mind that you have to make sure they get formatted correctly from Customizer. For example colors need to either be prefixed with a # for hex colors or be formatted as rgb() or rgba() definitions. A size variable would usually need to be appended with ‘px‘, ‘em‘, ‘%‘, and so on.
If you plan to make an advanced system for compiling SCSS variables through Customizer theme, make sure you have a good system in place to properly format each type of variable!
Let’s get the first step out of the way; downloading and including the library in our theme:
Downloading and including the SCSSPHP library in your theme
The first step is downloading the SCSSPHP library. In the linked page click on the “Download” button at the very top. If you rather want to use Composer, the site provides a guide on this.
Extract the zip into a subfolder somewhere within your theme. As an example I’m placing it inside the theme/inc/scssphp/ folder.
Open up the PHP file where you want to add your code for compiling. It can be directly inside your theme’s functions.php or a PHP file included by functions.php. For simplicity’s sake I’m writing everything inside functions.php.
Before we can use the library we need to include it; like so:
require_once(get_stylesheet_directory() . '/inc/scssphp/scss.inc.php');
Adjust the path to your files accordingly. We need to include the scss.inc.php file found inside the library root folder. Now, after this line we can use the library’s classes!
2. Creating the Customizer settings for the SCSS variables
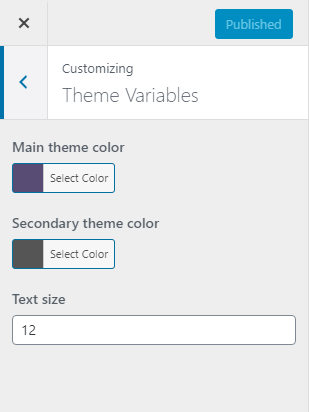
Let’s create the WordPress Customizer settings for our variables. For the tutorial’s sake we will add settings for the SCSS variables mentioned above: two colorpickers and a number input.
I won’t go into detail explaining how to add Customizer settings – there are plenty of tutorials for this. In the code example below I create a new section and put the three settings inside:
functions.php
add_action('customize_register', function($wp_customize) {
	$wp_customize->add_section('theme-variables', [
		'title' => __('Theme Variables', 'txtdomain'),
		'priority' => 25
	]);

	$wp_customize->add_setting('theme-main', ['default' => '#594c74']);
	$wp_customize->add_control(new WP_Customize_Color_Control($wp_customize, 'theme-main', [
		'section' => 'theme-variables',
		'label' => __('Main theme color', 'txtdomain'),
		'priority' => 10
	]));

	$wp_customize->add_setting('theme-secondary', ['default' => '#555']);
	$wp_customize->add_control(new WP_Customize_Color_Control($wp_customize, 'theme-secondary', [
		'section' => 'theme-variables',
		'label' => __('Secondary theme color', 'txtdomain'),
		'priority' => 20
	]));

	$wp_customize->add_setting('theme-text-size', ['default' => '12']);
	$wp_customize->add_control('theme-text-size', [
		'section' => 'theme-variables',
		'label' => __('Text size', 'txtdomain'),
		'type' => 'number',
		'priority' => 30,
		'input_attrs' => ['min' => 8, 'max' => 20, 'step' => 1]
	]);
});
This code hooks onto customize_register and adds a section called “Theme Variables”. It then proceeds to add a colorpicker ‘theme-main‘, another colorpicker ‘theme-secondary‘ and a number input ‘theme-text-size‘. This is all default WordPress functionality. I also add set each setting’s default to the same values as defined in the variables.scss file. This is just to ensure that the Customizer settings initiate with the correct colors.
It’s looking great! But as of right now nothing happens when you adjust these variables. Let’s continue with step 3; handling preview in Customizer.
3. Compile CSS on the go in Customizer preview
This step handles updating the Customizer preview while the user is changing settings, and won’t write to any of our files. Instead we will output the compiled CSS in the <head> of the preview inside a <style> tag. This way we ensure that the inline CSS overrides all styling from the original CSS file.
In order to check whether or not we are currently using Customizer preview, we use the function is_customize_preview(). When this returns true we create a function hooked onto wp_head. Inside the function we initiate and set up the SCSSPHP library, fetch the current setting values, compile the CSS and output it in a <style> tag.
require_once(get_stylesheet_directory() . '/inc/scssphp/scss.inc.php');

if (is_customize_preview()) {
	add_action('wp_head', function() {
		$compiler = new ScssPhp\ScssPhp\Compiler();

		$source_scss = get_stylesheet_directory() . '/assets/scss/style.scss';
		$scssContents = file_get_contents($source_scss);
		$import_path = get_stylesheet_directory() . '/assets/scss';
		$compiler->addImportPath($import_path);

		$variables = [
			'$main' => get_theme_mod('theme-main', '#594c74'),
			'$secondary' => get_theme_mod('theme-secondary', '#555'),
			'$text-size' => get_theme_mod('theme-text-size', '12') . 'px',
		];
		$compiler->setVariables($variables);

		$css = $compiler->compile($scssContents);
		if (!empty($css) && is_string($css)) {
			echo '<style type="text/css">' . $css . '</style>';
		}
	});
}
At line #7 we define the path to the source SCSS file and load its content into a variable at #8. And at line #9 and #10 we set up the import path for the library to ensure any @imports work correctly in our SCSS files. You can read more about this in the library’s documentation site, under the heading “Import Paths”. Basically the SCSSPHP library needs to know the relative path of your SCSS folder so that all @imports paths are correct.
At line #12-16 we create the array for the compiler; an associative array with the variable names as keys. For the values we use get_theme_mod() to get the values from Customizer. The function get_theme_mod() allows you to define a default as second parameter if the value was not saved. This saves us from crashing the compiler with values such as null. So we provide the same default as in our SCSS variables file and when we registered the Customizer settings.
Also note that the code at line #15 appends a ‘px‘, ensuring that the actual variable value is valid. Otherwise it would compile as “$text-size: 12;” when we need “$text-size: 12px;“. We provide the variables array to the compiler at line #17, telling it to compile using these variables.
Then at line #19-22 we call the compile() function which should return the compiled CSS as a string. We output a <style> tag with the CSS string inside. Because we’re hooked onto wp_head, the Customizer will render the preview with the changed CSS every time a change is made.
4. Saving the compiled CSS onto the theme’s stylesheet
The code for compiling the CSS is very similar to the previous step. The only difference is that we are now writing the CSS onto a file instead of outputting it. You should really consider putting this in a function so that you don’t repeat code, but for clarity’s sake I’ve chosen to separate the two.
We hook onto customize_save_after which triggers whenever someone clicks Save in WordPress Customizer. At this point we fetch the source SCSS, defines variables values and compile it into CSS. With the CSS string we use a simple PHP function to write it to the theme’s CSS file.
add_action('customize_save_after', function() {
	$compiler = new ScssPhp\ScssPhp\Compiler();

	$source_scss = get_stylesheet_directory() . '/assets/scss/style.scss';
	$scssContents = file_get_contents($source_scss);
	$import_path = get_stylesheet_directory() . '/assets/scss';
	$compiler->addImportPath($import_path);
	$target_css = get_stylesheet_directory() . '/style.css';

	$variables = [
		'$main' => get_theme_mod('theme-main', '#594c74'),
		'$secondary' => get_theme_mod('theme-secondary', '#555'),
		'$text-size' => get_theme_mod('theme-text-size', '12') . 'px',
	];
	$compiler->setVariables($variables);

	$css = $compiler->compile($scssContents);
	if (!empty($css) && is_string($css)) {
		file_put_contents($target_css, $css);
	}
});
The only difference from before is at line #8 where we define the target file to write to, and line #19 where we write to the file.
Conclusion
We now have Customizer settings that control variables in the theme’s SCSS file, and overwrites the theme’s main stylesheet using those variables. There’s no limit to how many or what kind of settings you want to allow the theme users to customize! Invest some time in setting up a proper system to handle the formatting of different variable types (e.g. prefixes or postfixes) and structuring the Customizer settings properly. The theme users will appreciate the flexibility and how easy it is to customize your theme!
You can also figure out different ways to handle the file writing of the final CSS. If you don’t want to overwrite the main stylesheet, perhaps you want to output it into a different file. You can also look into using if-else conditionals in SCSS.
This tutorial was written to give you a springboard into how you can customize your WordPress theme from Customizer. Let me know if it was any use for you – or if you want a more advanced tutorial that ensures the theme’s stylesheet isn’t overwritten!