
This post will show you how you can use Advanced Custom Fields (ACF) to allow adding icons to your menu. In this example we’ll add a Fontawesome icon, but you can modify the code to fit your needs. You could instead add a file picker for SVG files or something else.
This guide will work with the free version of Advanced Custom Fields, but make sure you have version 5.6 or newer.
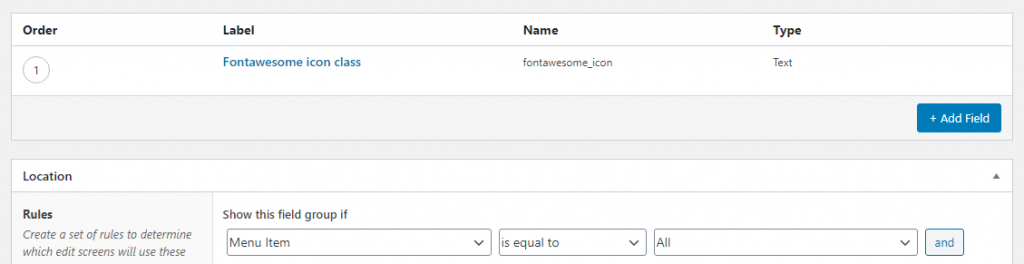
Adding the ACF group and field
The first step is adding the field itself to menu items. This guide will add a text input to type in the class name for the Fontawesome icon, but if you want another solution (e.g. file picker for SVG file), modify the field inputs.
Make sure your Advanced Custom Field group’s location is set to “Menu Item”. You can set it to “All”, or you can specify by menu locations or by specific menus.

If you are adding your fields and group by code, set the location param to ‘nav_menu_item‘. Refer to my complete reference for adding ACF fields by code to learn more.
acf_add_local_field_group([
	...
	'location' => [
		[
			[
				'param' => 'nav_menu_item',
				'operator' => '==',
				'value' => 'all'
			]
		]
	]
]);
As for the field itself, we’ll add a simple text input with the name ‘fontawesome_icon‘.
Or by code, add the field like so:
[
	'key' => 'field_fontawesome_icon',
	'label' => __('Fontawesome icon class', 'txtdomain'),
	'name' => 'fontawesome_icon',
	'instructions' => __('Type the name of a <a href="https://fontawesome.com/icons?d=gallery&m=free" target="_blank">Fontawesome icon</a> class. Example: "fab fa-facebook".', 'txtdomain'),
	'type' => 'text',
]
To make it more user-friendly it’s a good idea to add a description with a link to the overview of available Fontawesome icons. I’m adding the link to show Free icons only, not any of the Pro, as this is the library I’ve got in my theme.
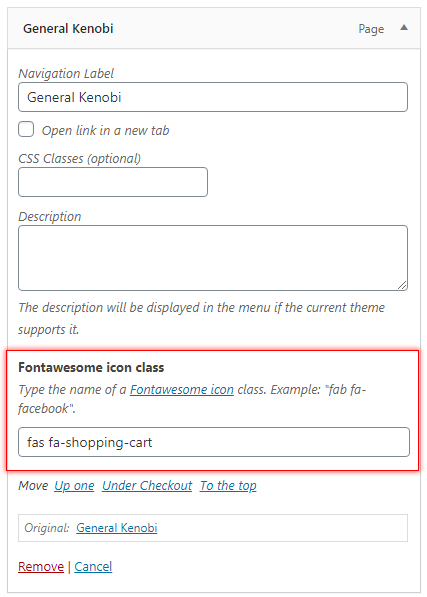
After saving the field in admin or in code, you should now get the additional field when you expand a menu item:
A note on Fontawesome classes
In the “older days”, before Fontawesome 5, providing a Fontawesome class could be somewhat simplified for the user. For the shopping cart you could simply write “shopping-cart” and in our code we could add the class “fa fa-” and then the given class (resulting in “fa fa-shopping-cart“). But since Fontawesome 5 the classes has been somewhat complicated.
The “global” class “fa” has been replaced with categories specific to the type of icon. For example social media or logos are in the brands category and requires the class “fab“, solid icons requires the class “fas“, while regular icons requires “far“, and so on. This is why we now have to require the theme user to type in both Fontawesome classes. It should be easy to find the right class as this is clearly shown in every icon on Fontawesome’s site:
As an example you need to enter “fas fa-shopping-cart” in our custom field on a menu item for the shopping cart icon.
Displaying the icon in the menu
The next and final step is rendering the icon in the menu if it’s set. To do this we use WordPress’ filter wp_nav_menu_objects. This filter is applied for every menu in all rendered menus right before generating its HTML, allowing us to modify the text output, classes and more.
How you want to output the icon is again up to you. Do you want to replace the link text with the icon, or do you want to show the icon either before or after the text link? We will follow Fontawesome custom by outputting a <i> tag with the provided class.
add_filter('wp_nav_menu_objects', function($items) {
	foreach ($items as &$item) {
		$icon = get_field('fontawesome_icon', $item);

		if ($icon) {
			$item->title = '<i class="' . $icon . '"></i>' . $item->title;
		}
	}
	return $items;
});
The way we modify the menu items is by looping through the menu items using pass by reference (adding a & before the variable). This means that any change we make to the item, this will be applied to the parenting items object.
For each item we use Advanced Custom Field’s get_field() function to get the value of our field, ‘fontawesome_icon‘. If it’s set, we are good to go. The above code example will add the icon before the text. If you wanted to add the icon after the text, replace line #6 with:
$item->title .= '<i class="' . $icon . '"></i>';
Or if you wanted to replace the text with an icon – showing no text at all, replace line #6 with:
$item->title = '<i class="' . $icon . '" title="' . $item->title . '"></i>';
I added a title attribute so it’s a little more informative for the frontend user. Since the text is removed it can sometimes be confusing for the end user what the menu item is for. But the title attribute makes sure the user gets a tooltip with the menu item’s text when hovering over the icon. This is fully optional of course.
If you are using a field of a different type, e.g. a filepicker for SVG files, you need to adjust the output accordingly.
And that’s it! You should now get a Fontawesome icon everywhere the menu is rendered. But you probably need to add some styling to it. For example adding some space between the icon and the text.
Adding classes for easier styling
You can add custom classes to the <i> tag or add some more HTML if necessary.
If you need to add a class to the wrapping menu item (the li element) you have full access to the menu item classes that will be applied in the filter above. Add a custom menu item class for icon menu items like so:
		...
		if ($icon) {
			$item->title = '<i class="' . $icon . '"></i>' . $item->title;
			$item->classes[] = 'menu-with-icon';
		}
		...
The menu should be output like this:
