
In this tutorial we’ll look into how to add a custom sidebar to the Inspector (right sidebar) in WordPress Gutenberg. Inside we’ll implement a field connected to a post meta. Everything is implemented with Javascript, inside the Gutenberg editor, and is an alternative to adding metaboxes the traditional way.
Heads up!
This is a tutorial in creating your own custom sidebar. But if you are interested in just adding meta/settings to the standard Inspector sidebar (“Document” tab), I have a tutorial for exactly that:
What we will create
WordPress Gutenberg allows developers to create custom sidebars by using creating a so-called Javascript plugin. (Not to be confused with traditional WordPress plugins). By using a Javascript plugin we can create a new sidebar, and also plug into the “Tools and Options” menu.
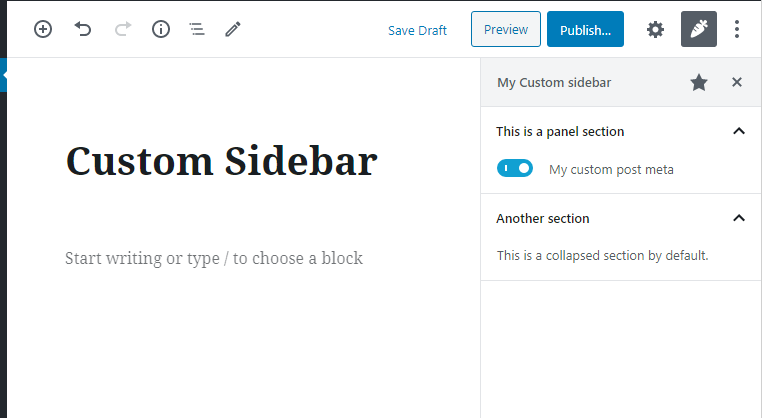
We will add a new menu item in the “Tools” which will open up our custom sidebar. The content of the sidebar is entirely up to you, but I’ll go through some examples, including how to connect a post meta field inside it.
Setting up your Javascript
For this tutorial I will write ES6/ESNext Javascript with JSX which means we need to set up a compiler. If you want to follow along and not write ES5 Javascript you will need to set up a development environment that compiles your Javascript as you go. If you are not familiar with this, follow my post explaining how to set this up, and then come back here.
I have set up my webpack.config.js to compile my source Javascript file into my theme-folder’s /assets/js/sidebar-plugin.js. This compiled file is what we need to enqueue to the Gutenberg editor. While I write this code I have started the run-time compiler that recompiles the Javascript everytime I save changes in the source code (npm run start). All of this is explained in-depth in the previously mentioned tutorial.
I am writing this in a theme, but it works the same in a plugin. Just remember to adjust the paths when adding the script to the editor.
Adding the script to the editor
For adding our script to the Gutenberg editor we need to write some PHP. If you are in a theme, functions.php is a good place to start, or somewhere in your plugin files. Note that we need to add the final compiled script, not the source code. In my example the compiled Javascript is located in my theme-folder’s /assets/js/sidebar-plugin.js.
We create a function hooked onto enqueue_block_editor_assets. Inside we do the usual wp_enqueue_script(). As dependencies to the script we add two; wp-plugins, and wp-edit-post. These two packages must be loaded before our script as we use functions from them.
add_action('enqueue_block_editor_assets', function() {
	wp_enqueue_script('awp-sidebar-plugin', get_stylesheet_directory_uri() . '/assets/js/sidebar-plugin.js', ['wp-plugins', 'wp-edit-post']);
});
Because we enqueue the script in the hook enqueue_block_editor_assets our script will only be loaded when the Gutenberg editor is active. Great! Now everything is ready to write our Javascript plugin.
Register a Javascript plugin
The first step is registering a plugin. We do this with the registerPlugin function in wp.plugins from inside the wp.plugins package.
As parameter to the registerPlugin we provide a name (make sure it’s unique), and an object with settings. As minimum you need to provide a component for the render property. You can also optionally add an icon from WordPress’ dashicons. Keep in mind that if you don’t specify an icon it will fall back to the plugin icon. For demonstration purposes I’m using the 'carrot' icon.
As for the component we start by defining a basic component that returns a simple div with some random text in it. And before all the code we destructure the functions from the packages we want to use.
const { registerPlugin } = wp.plugins;

const CustomSidebarComponent = () => {
	return(
		<div>Hey!</div>
	);
}

registerPlugin('awp-customsidebar', {
	render: CustomSidebarComponent,
	icon: 'carrot'
});
If nothing happens (not even errors) when you refresh Gutenberg we are all good to go. We don’t see our component because we haven’t told WordPress where to render it. The next step is hooking onto the custom sidebar menu and tools menu components for rendering our stuff.
Register a custom sidebar
But first an explanation in how Gutenberg handles custom sidebars and why we need to do what we will do. When we successfully register a custom sidebar one thing will automatically happen initially. Gutenberg will add a shortcut to our sidebar in the top toolbar, next to the Tools menu. This happens because our sidebar automatically gets “pinned”.
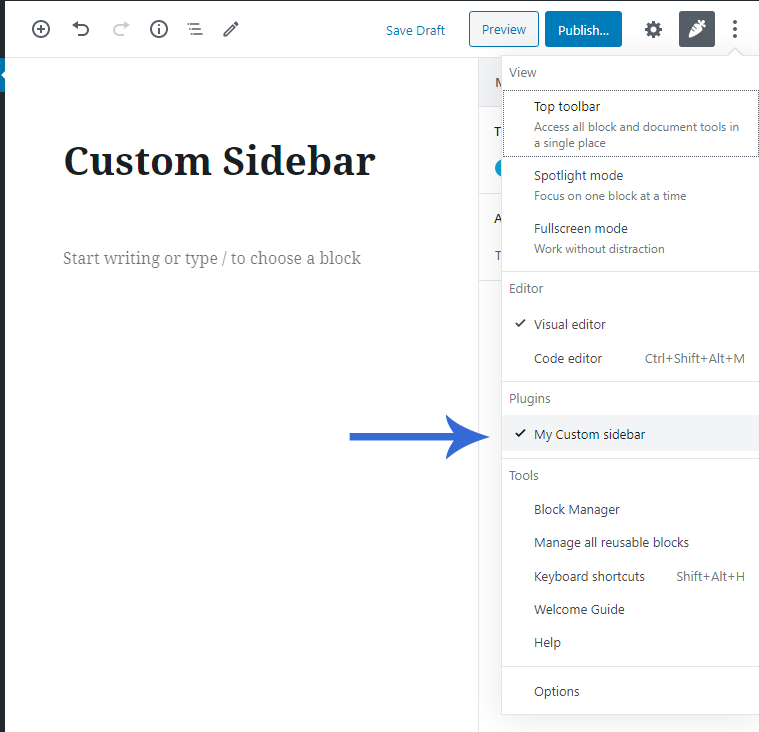
The problem of just adding a custom sidebar is that any user can “unpin” this shortcut. When they do that, there is no access point to open the sidebar again! This is why we need to also add a menu item to the Tools menu.
Registering a custom sidebar is done with the component PluginSidebar from the wp.editPost package. Adding a menu item to the Tools menu is done with the aptly named component PluginSidebarMoreMenuItem (also in the wp.editPost package).
For the PluginSidebar component we need to provide some props. You should provide as minimum name and title. The prop title is self-explanatory, this is the name that will appear in the top of the sidebar. In the prop name provide an unique slug. When you add the menu item you need to refer to this slug.
Adding a PluginSidebarMoreMenuItem (tools menu) component requires as minimum one prop; target. Here you provide the same name as you gave in the sidebar’s name prop. As content of the component you write the text that will be displayed as menu item. Usually this would be the same as the sidebar’s title.
Because React requires a single wrapping node around the component’s return, we wrap everything inside a Fragment component (from the wp.element package). I am also wrapping my strings in __() from the wp.i18n package to allow for translation.
const { registerPlugin } = wp.plugins;
const { __ } = wp.i18n;
const { Fragment } = wp.element;
const { PluginSidebarMoreMenuItem, PluginSidebar } = wp.editPost;
const CustomSidebarComponent = () => {
return(
<Fragment>
<PluginSidebar
name="awp-custom-sidebar"
title={__('My Custom sidebar', 'awp')}
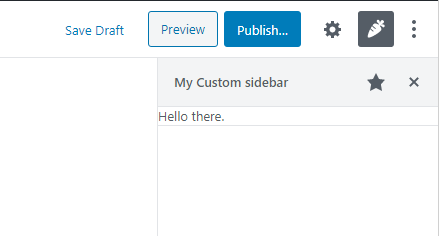
>Hello there.</PluginSidebar>
<PluginSidebarMoreMenuItem
target='awp-custom-sidebar'
>{__('My Custom sidebar', 'awp')}</PluginSidebarMoreMenuItem>
</Fragment>
);
}
registerPlugin('awp-customsidebar', {
render: CustomSidebarComponent,
icon: 'carrot'
});
With the above code we will get the following two (most likely three) things happening. You will get a carrot icon shortcut in the toolbar (if you haven’t unpinned it yet). Clicking on this will open up the sidebar. You will also have got a new menu item to the sidebar in the Tools Menu, under the headline “Plugins”.
Adding content to the sidebar
The actual content of the sidebar is entirely up to you. You just need to add HTML or components inside the PluginSidebar component with whatever you want (in place of the “Hello there.” text).
You might notice that the sidebar content is missing padding. This is intentional because the idea is that you will create panels inside this sidebar. Panels are the collapsible sections in the normal Gutenberg sidebar. Those are components that you can very easily add inside your custom sidebar. You can add as many panels as you want to and they are great for grouping different things up.
Adding panels into our sidebar
Let’s quickly look at how we can add panels to our sidebar. If you have created your own custom block types you might be familiar with these components. We use PanelBody and optionally PanelRow from the wp.components package.
For a PanelBody component you provide as minimum the prop title. You can optionally provide true or false to the initialOpen prop to decide if the panel should be expanded as default or not. As content inside the component is everything inside the panel.
Inside a PanelBody you can optionally use PanelRow components. They are not really necessary but can help you get a good styling for your panel content.
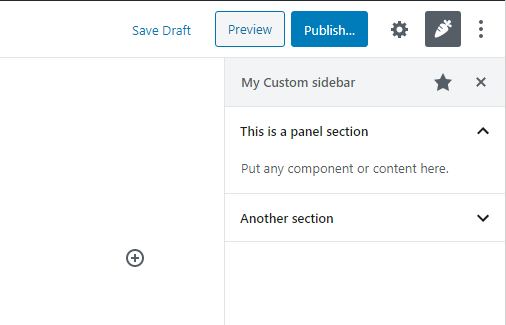
For example’s sake let’s add two panels to our custom sidebar.
const { registerPlugin } = wp.plugins;
const { __ } = wp.i18n;
const { Fragment } = wp.element;
const { PluginSidebarMoreMenuItem, PluginSidebar } = wp.editPost;
const { PanelBody, PanelRow } = wp.components;

const CustomSidebarComponent = () => {
	return(
		<Fragment>
			<PluginSidebarMoreMenuItem
				target='awp-custom-sidebar'
				>{__('My Custom sidebar', 'awp')}</PluginSidebarMoreMenuItem>
			<PluginSidebar
				name="awp-custom-sidebar"
				title={__('My Custom sidebar', 'awp')}
			>
				<PanelBody
					title={__('This is a panel section', 'awp')}
					initialOpen={true}
				>
					<PanelRow>
						Put any component or content here.
					</PanelRow>
				</PanelBody>
				<PanelBody
					title={__('Another section', 'awp')}
					initialOpen={false}
				>
					<PanelRow>
						This is a collapsed section by default.
					</PanelRow>
				</PanelBody>
			</PluginSidebar>
		</Fragment>
	);
}

registerPlugin('awp-customsidebar', {
	render: CustomSidebarComponent,
	icon: 'carrot'
});
With this code our custom sidebar starts to really look like it belongs in Gutenberg!
Adding post meta fields to the custom sidebar
Now we’re really getting into the meat of the useful stuff for a custom sidebar; adding settings and storing their values. But first we need to understand how.
It’s really easy to add setting fields (inputs, checkboxes, toggle fields, etc) in the sidebar by using the ready-to-use components in WordPress’ packages. However we need to consider how to store the values. The obvious option is storing them as post meta. But connecting a setting to a post meta field requires some extra code. More specifically we need to use so-called higher-order-components in order to fetch and update post meta inside Javascript. We also need to register each post meta using PHP and make them available to the REST API.
To close of this tutorial I will demonstrate how to add a post meta with key awp_my_custom_meta that should be stored as either true or false. In the sidebar it will be displayed as a toggle field (a true/false component).
Register post meta for REST API
The first step to adding post meta in our Javascript file is registering them and defining them as accessible in REST API. To do this we return to PHP again.
Inside a function hooked to the init action we use the register_meta() function. As parameters we need to define the object type as ‘post‘ because we’re using it as post meta (it doesn’t exclude e.g. page post type). We provide the meta key, and then an array of arguments. The critical thing to add in the arguments array is setting ‘show_in_rest‘ to true. Post meta is commonly used as ‘single‘ (think how you use get_post_meta()). We also define the type. As for our case we set it to ‘boolean‘.
add_action('init', function() {
	register_meta('post', 'awp_my_custom_meta', [
		'show_in_rest' => true,
		'single' => true,
		'type' => 'boolean'
	]);
});
With this code the ‘awp_my_custom_meta‘ post meta field is accessible from Gutenberg. You need to repeat the register_meta() for each post meta you wish to add in your sidebar.
Now let’s return to our Javascript.
Adding a setting to our sidebar
Let’s start with the easy part: Adding the input to our sidebar. Later on we will add more code to actually connect the setting field to post meta. Because of the way we need to do this, we define a separate new component for our setting. So inside the panel you want to add your settings to you simply call this new component.
Let’s call the component CustomSidebarMetaComponent (you might call it something relevant to your project). Inside this component we want to render a toggle field. To do this we use the ToggleControl component from the wp.components package. As props to the ToggleControl we provide a fitting label in the title prop. A ToggleControl also need the props onChange for updating the value and checked for the current value. We will omit these two for now until the next step.
...
const { PanelBody, PanelRow, ToggleControl } = wp.components;

const CustomSidebarMetaComponent = () => {
	return(
		<ToggleControl
	        label={__('My custom post meta', 'awp')}
	    />
	);
}

const CustomSidebarComponent = () => {
	return(
		...
		<PanelBody
			title={__('This is a panel section', 'awp')}
			initialOpen={true}
		>
			<PanelRow>
				<CustomSidebarMetaComponent />
			</PanelRow>
		</PanelBody>
		...
With the above code you should get a toggle field in the sidebar. It is unchecked and nothing happens when you click on it. That’s the next step: connecting it to our post meta.
Accessing post meta with withSelect and withDispatch
In order to access as well as update a post meta value we need to use higher-order-components (HOC) to access WordPress’ version of stores (similar to Redux). WordPress provides us with some useful HOC with functions we can use in the wp.data package.
The higher-order component withSelect is provide our component with props that are, in our case, fetched from post meta. We use this to get the value of our post meta. Inside withSelect we can use select('core/editor').getEditedPostAttribute('meta') to fetch the current post’s meta.
On the other hand, withDispatch is a higher-order component that can perform actions. In our case we want to update the post meta when the corresponding field setting is changed in our sidebar. Inside this component we use dispatch('core/editor').editPost() to inform WordPress to dispatch an action. Inside the object we provide we tell WordPress that it’s meta we want to update.
Finally we need to combine withSelect and withDispatch with our component that handles the post meta field (CustomSidebarMetaComponent). To do this we use WordPress’ compose from the wp.compose package. The idea is that withSelect and withDispatch provides our CustomSidebarMetaComponent component with props. withSelect provides the value of the post meta as prop, and withDispatch provides a function that we can call to update the value as prop. We set these props to our ToggleField checked and onChange, correspondingly.
That’s a lot of explaining. Let’s look at the actual code:
...
const { compose } = wp.compose;
const { withDispatch, withSelect } = wp.data;

const CustomSidebarMetaComponent = (props) => {
	return(
		<ToggleControl
	        label={__('My custom post meta', 'awp')}
	        checked={props.customPostMetaValue}
	        onChange={props.setCustomPostMeta}
	    />
	);
}

const CustomSidebarMeta = compose([
	withSelect(select => {
		return { customPostMetaValue: select('core/editor').getEditedPostAttribute('meta')['awp_my_custom_meta'] }
	}),
	withDispatch(dispatch => {
		return {
			setCustomPostMeta: function(value) {
				dispatch('core/editor').editPost({ meta: { awp_my_custom_meta: value } });
			}
		}
	})
])(CustomSidebarMetaComponent);

const CustomSidebarComponent = () => {
	return(
		...
		<PanelBody
			title={__('This is a panel section', 'awp')}
			initialOpen={true}
		>
			<PanelRow>
				<CustomSidebarMeta />
			</PanelRow>
		</PanelBody>
		...
Let’s start at the beginning. Which is at the bottom. At line #36 we change the component we render in our sidebar to the component we created with compose (at line #15). The CustomSidebarMeta component will combine the withSelect and withDispatch components and return the CustomSidebarMetaComponent.
The CustomSidebarMetaComponent will have access to the customPostMetaValue prop from the withSelect, and the setCustomPostMeta prop from withDispatch These two we we use for the checked and onChange props in the ToggleField.
Note that in line #5 we add props as parameters to the components as to make props accessible in the component.
Conclusion and final words
I do hope this tutorial was of some use to you. This is what I managed to comprehend on the topic during a lot of trial and error. There’s barely any documentation on this topic out there yet. I am still struggling with this, especially when it comes to efficiently handle multiple post meta. If I manage to learn some good tricks I’ll update this tutorial for sure!
Hopefully by following this tutorial you should have code that successfully adds a new custom sidebar to the WordPress Gutenberg editor, and hopefully with some meaningful content and settings. Here is the final code for the custom sidebar with post meta field.
sidebar-plugin.js
const { registerPlugin } = wp.plugins;
const { __ } = wp.i18n;
const { Fragment } = wp.element;
const { PluginSidebarMoreMenuItem, PluginSidebar } = wp.editPost;
const { PanelBody, PanelRow, ToggleControl } = wp.components;
const { compose } = wp.compose;
const { withDispatch, withSelect } = wp.data;

const CustomSidebarMetaComponent = (props) => {
	return(
		<ToggleControl
	        label={__('My custom post meta', 'awp')}
	        checked={props.customPostMetaValue}
	        onChange={props.setCustomPostMeta}
	    />
	);
}

const CustomSidebarMeta = compose([
	withSelect(select => {
		return { customPostMetaValue: select('core/editor').getEditedPostAttribute('meta')['awp_my_custom_meta'] }
	}),
	withDispatch(dispatch => {
		return {
			setCustomPostMeta: function(value) {
				dispatch('core/editor').editPost({ meta: { awp_my_custom_meta: value } });
			}
		}
	})
])(CustomSidebarMetaComponent);

const CustomSidebarComponent = () => {
	return(
		<Fragment>
			<PluginSidebarMoreMenuItem
				target='awp-custom-sidebar'
				icon='carrot'
			>{__('My Custom sidebar', 'awp')}</PluginSidebarMoreMenuItem>
			<PluginSidebar
				name="awp-custom-sidebar"
				title={__('My Custom sidebar', 'awp')}
			>
				<PanelBody
					title={__('This is a panel section', 'awp')}
					initialOpen={true}
				>
					<PanelRow>
						<CustomSidebarMeta />
					</PanelRow>
				</PanelBody>
				<PanelBody
					title={__('Another section', 'awp')}
					initialOpen={false}
				>
					<PanelRow>
						This is a collapsed section by default.
					</PanelRow>
				</PanelBody>
			</PluginSidebar>
		</Fragment>
	);
}

registerPlugin('awp-customsidebar', {
	render: CustomSidebarComponent,
	icon: 'carrot'
});
functions.php
add_action('enqueue_block_editor_assets', function() {
	wp_enqueue_script('awp-sidebar-plugin', get_stylesheet_directory_uri() . '/assets/js/sidebar-plugin.js', ['wp-plugins', 'wp-edit-post']);
});

add_action('init', function() {
	register_meta('post', 'awp_my_custom_meta', [
		'show_in_rest' => true,
		'single' => true,
		'type' => 'boolean'
	]);
});